
Browse docs
Map CSV columns
Match each spreadsheet column to a lead field, for a LinkedIn CSV or an email list, so every lead imports with the right name, company, profile and email.
Updated
On this page
When you upload a CSV, ReacherPro doesn't need your columns in a set order or with set names. It reads the headers in your file and asks which column holds each field. This guide explains how that matching works, what's required and what to check before you publish.
Before you start: You need a CSV file (
.csv, 10MB or smaller) with a header row. For a LinkedIn CSV you also need a connected LinkedIn seat. An Email list doesn't need one. Getting to the upload screen is covered in Create a lead list.
How it works
- You choose your file. ReacherPro reads it in your browser and lists its column headers.
- It fills in the mapping for you. It matches headers it recognises, and when a header gives nothing away, it looks at what's in the column.
- You check each field and fix anything that's wrong. Only the fields you map are imported.
- You preview the leads, then publish the list.
The fields you can map
| Field | LinkedIn CSV | Email list | What it's used for |
|---|---|---|---|
| First name | Optional | Optional | Personalisation, for example first_name in messages and emails |
| Last name | Optional | Optional | The lead's full name |
| Job title | Optional | Optional | The lead's role |
| Company | Optional | Optional | The lead's company, for example company_name in emails |
| LinkedIn URL | Required | Optional | The profile ReacherPro looks up and contacts on LinkedIn |
| Optional | Required | The address email steps send to | |
| Phone | Optional | Optional | Shown in the lead's contact details |
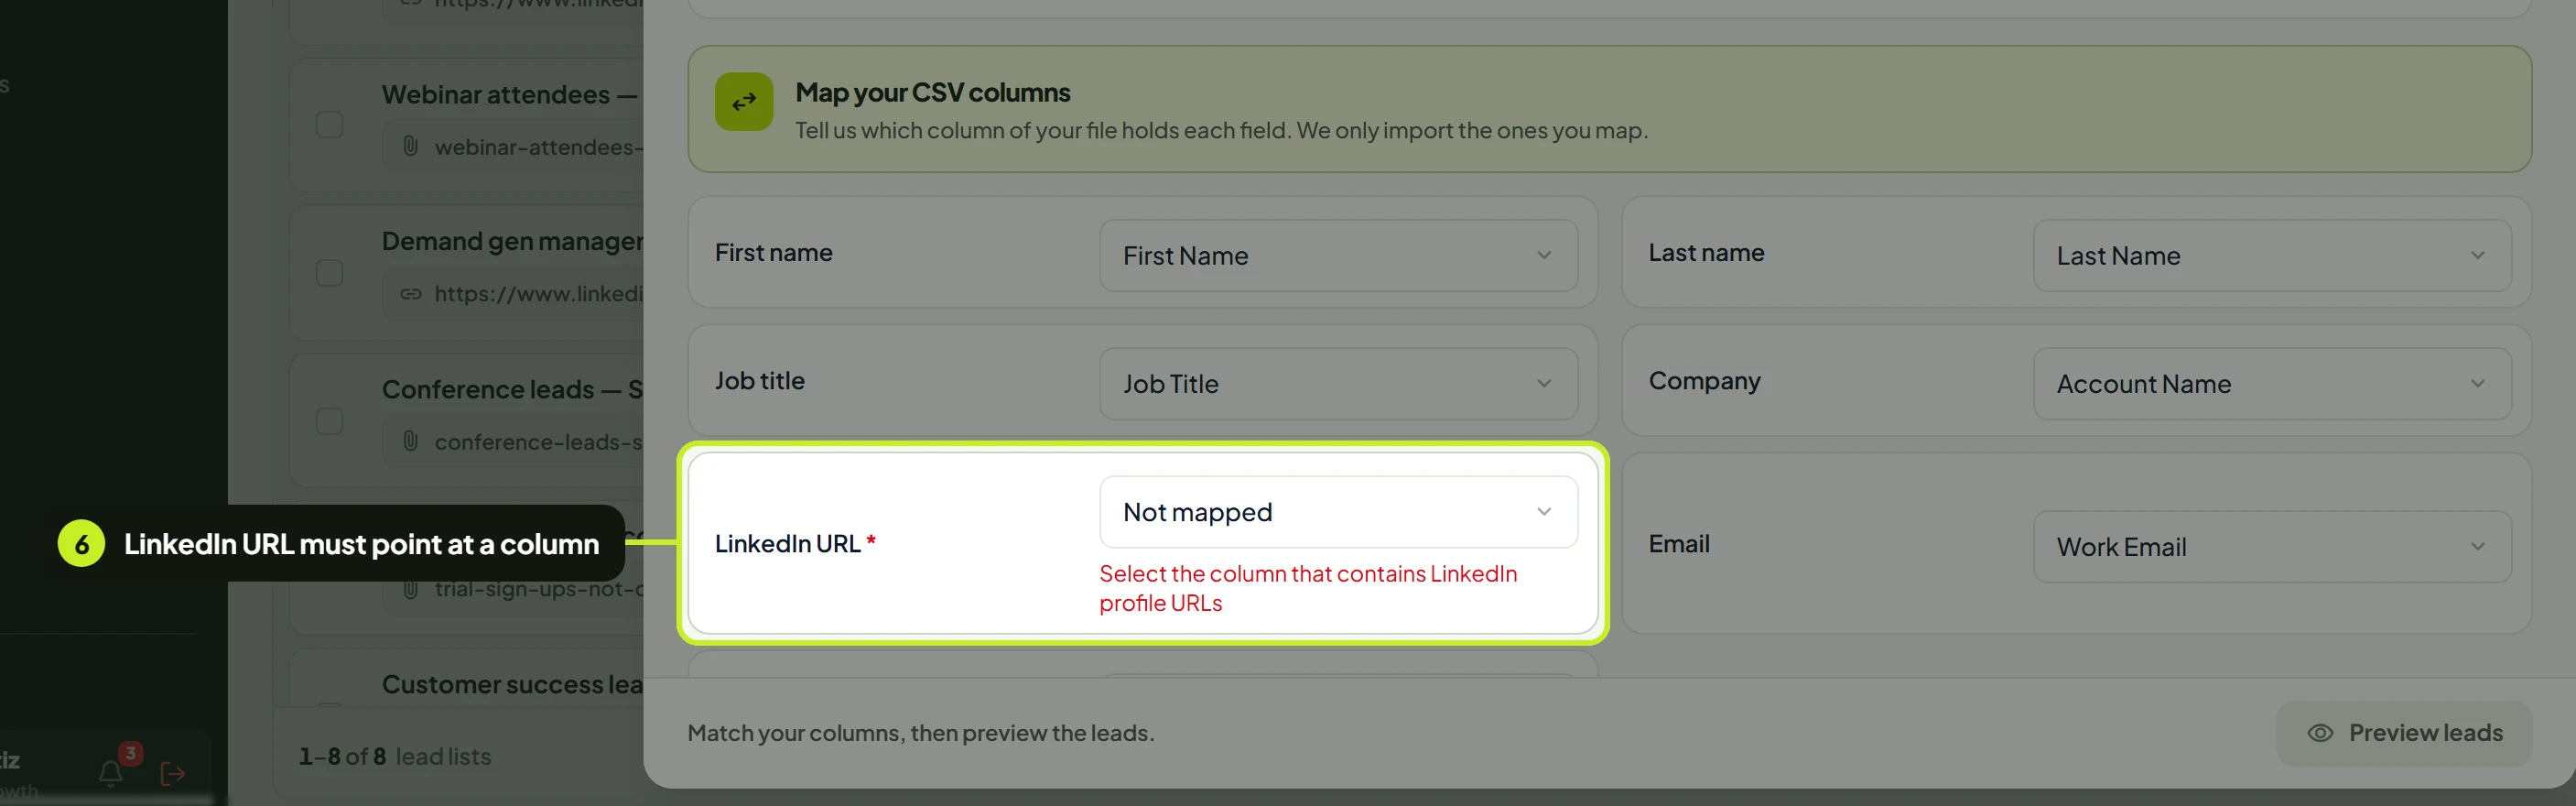
A required field has a red * next to it. Preview leads stays disabled until it's mapped.
Map a LinkedIn CSV
- In the CSV File Upload wizard, enter a List Name and choose a LinkedIn Account.
- Optional: click Download Sample to get
sample-leads.csv, a small file with the right headers (firstName,lastName,jobTitle,companyName,linkedin_urls,emails,phone). - Under CSV File (max 10MB), click Choose File and pick your file.
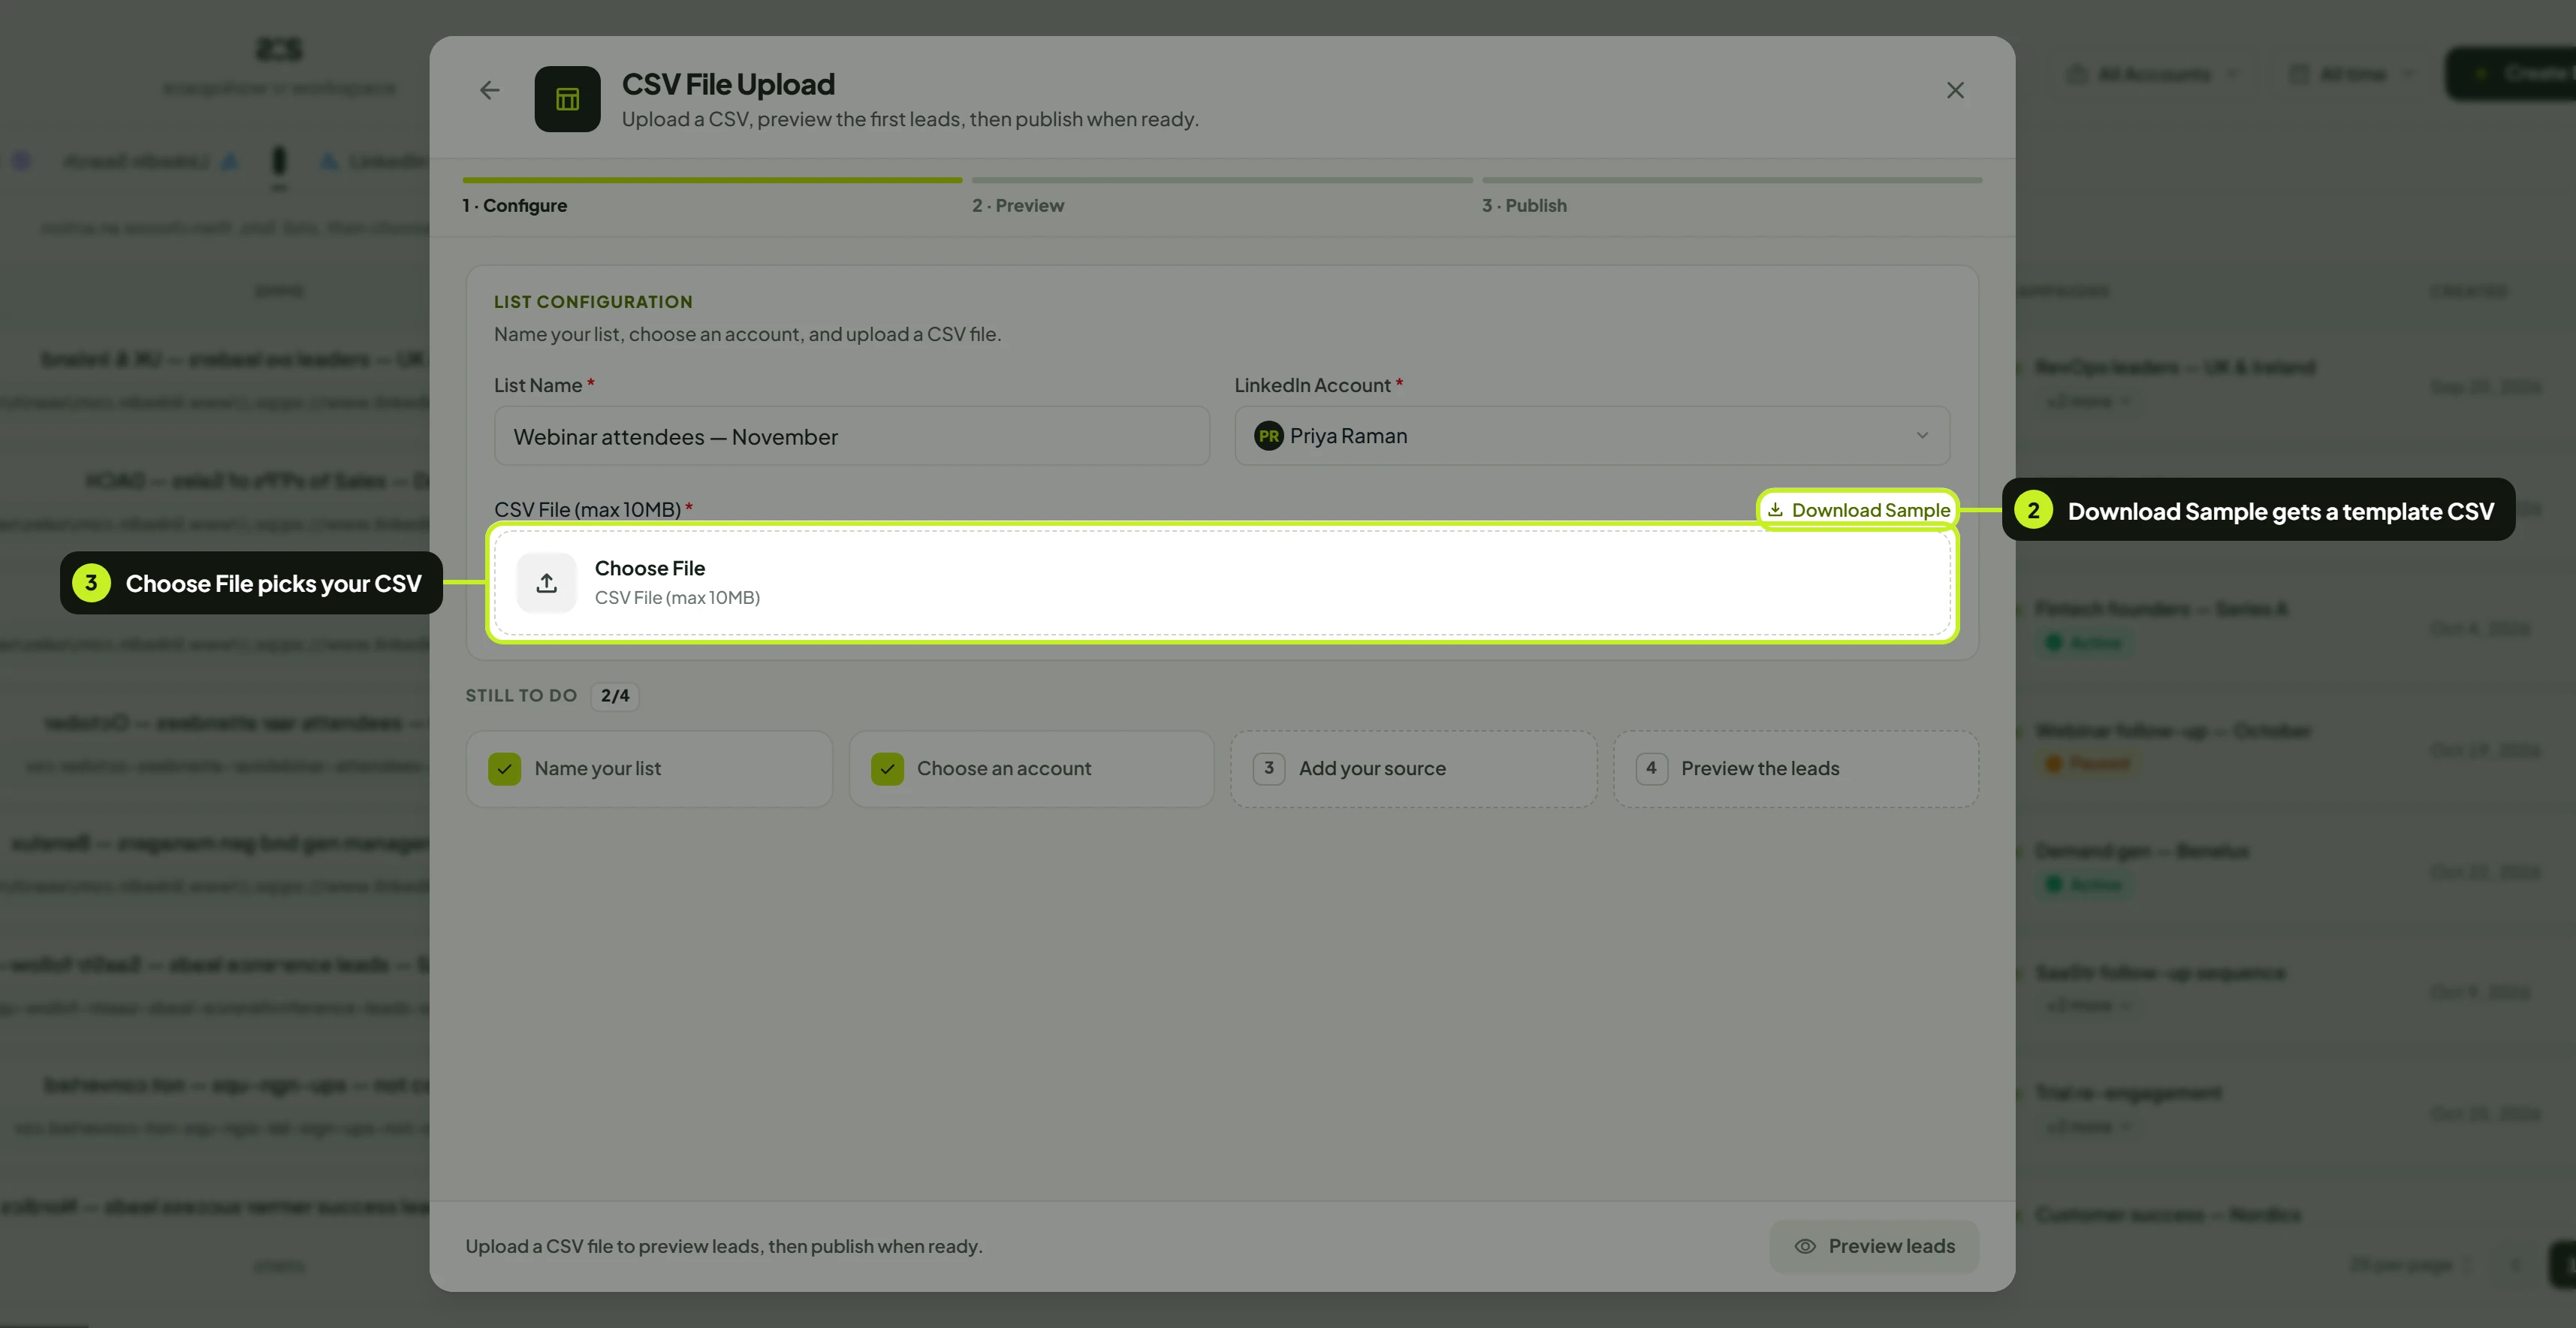
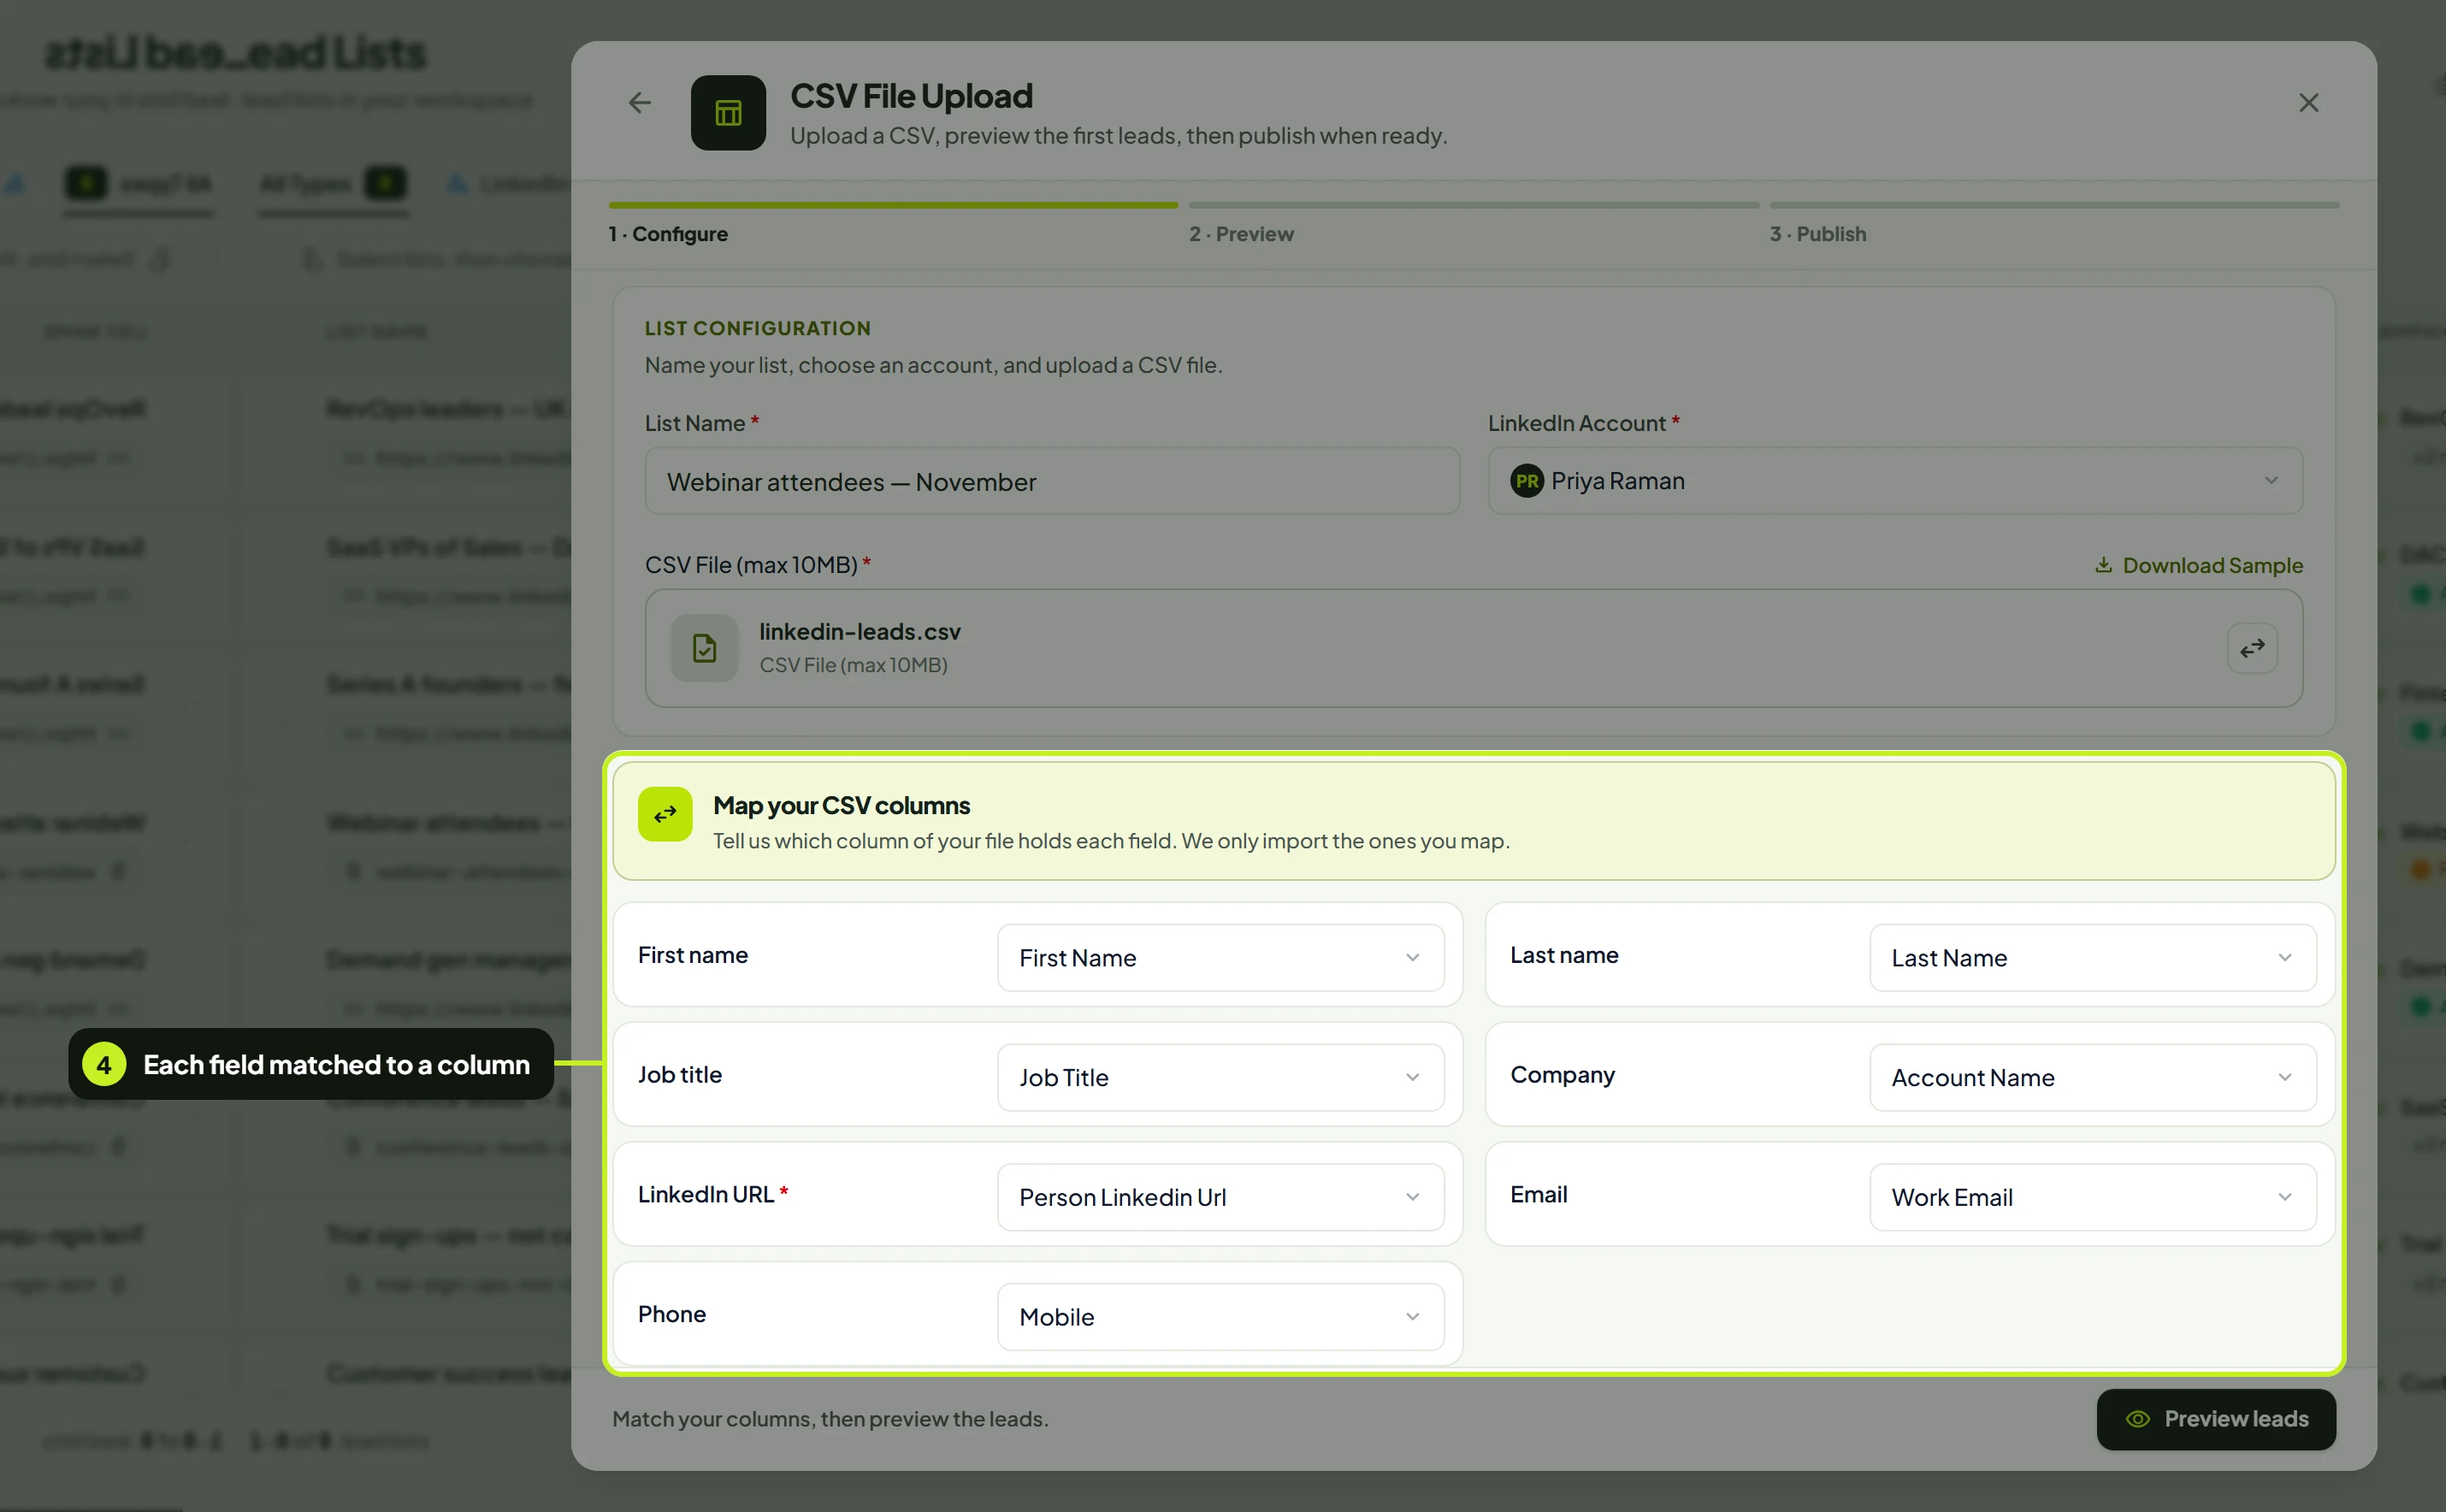
Map your CSV columns appears below the list configuration, with one row per field.
- Check each row. On the left is the field. On the right is the column from your file that ReacherPro picked for it, or Not mapped.
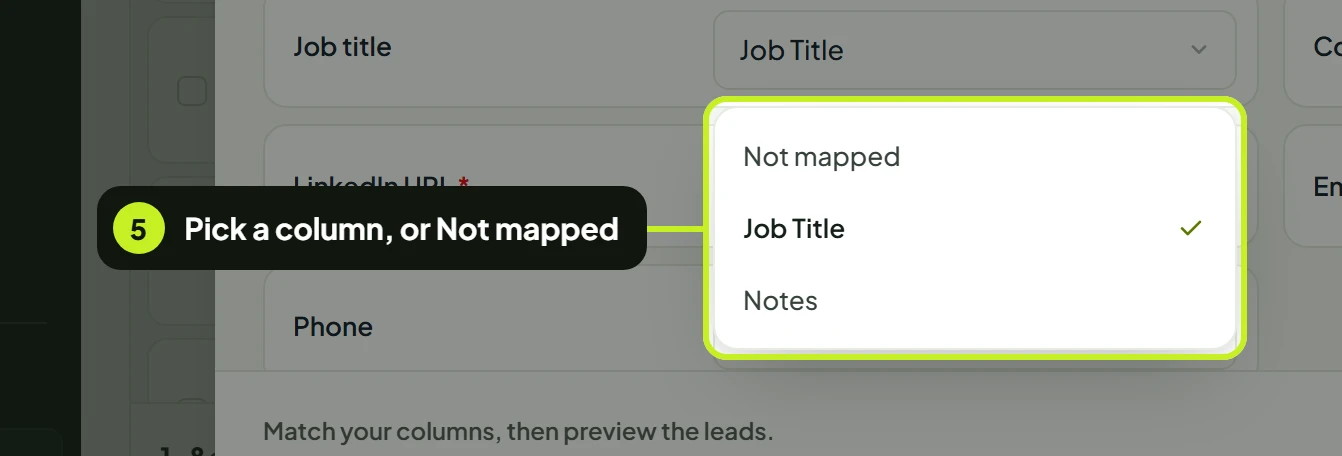
- To change a field, open its menu and pick another column. Pick Not mapped to leave that field out.
- Make sure LinkedIn URL points at the column with profile links such as
https://www.linkedin.com/in/…. If it's Not mapped, you'll see Select the column that contains LinkedIn profile URLs under it.
- Click Preview leads. The preview shows the leads that will be imported, with a count such as 9 leads found. A big file shows the first 50, with a line such as Showing first 50 of 1,240 leads.
- Click Publish.
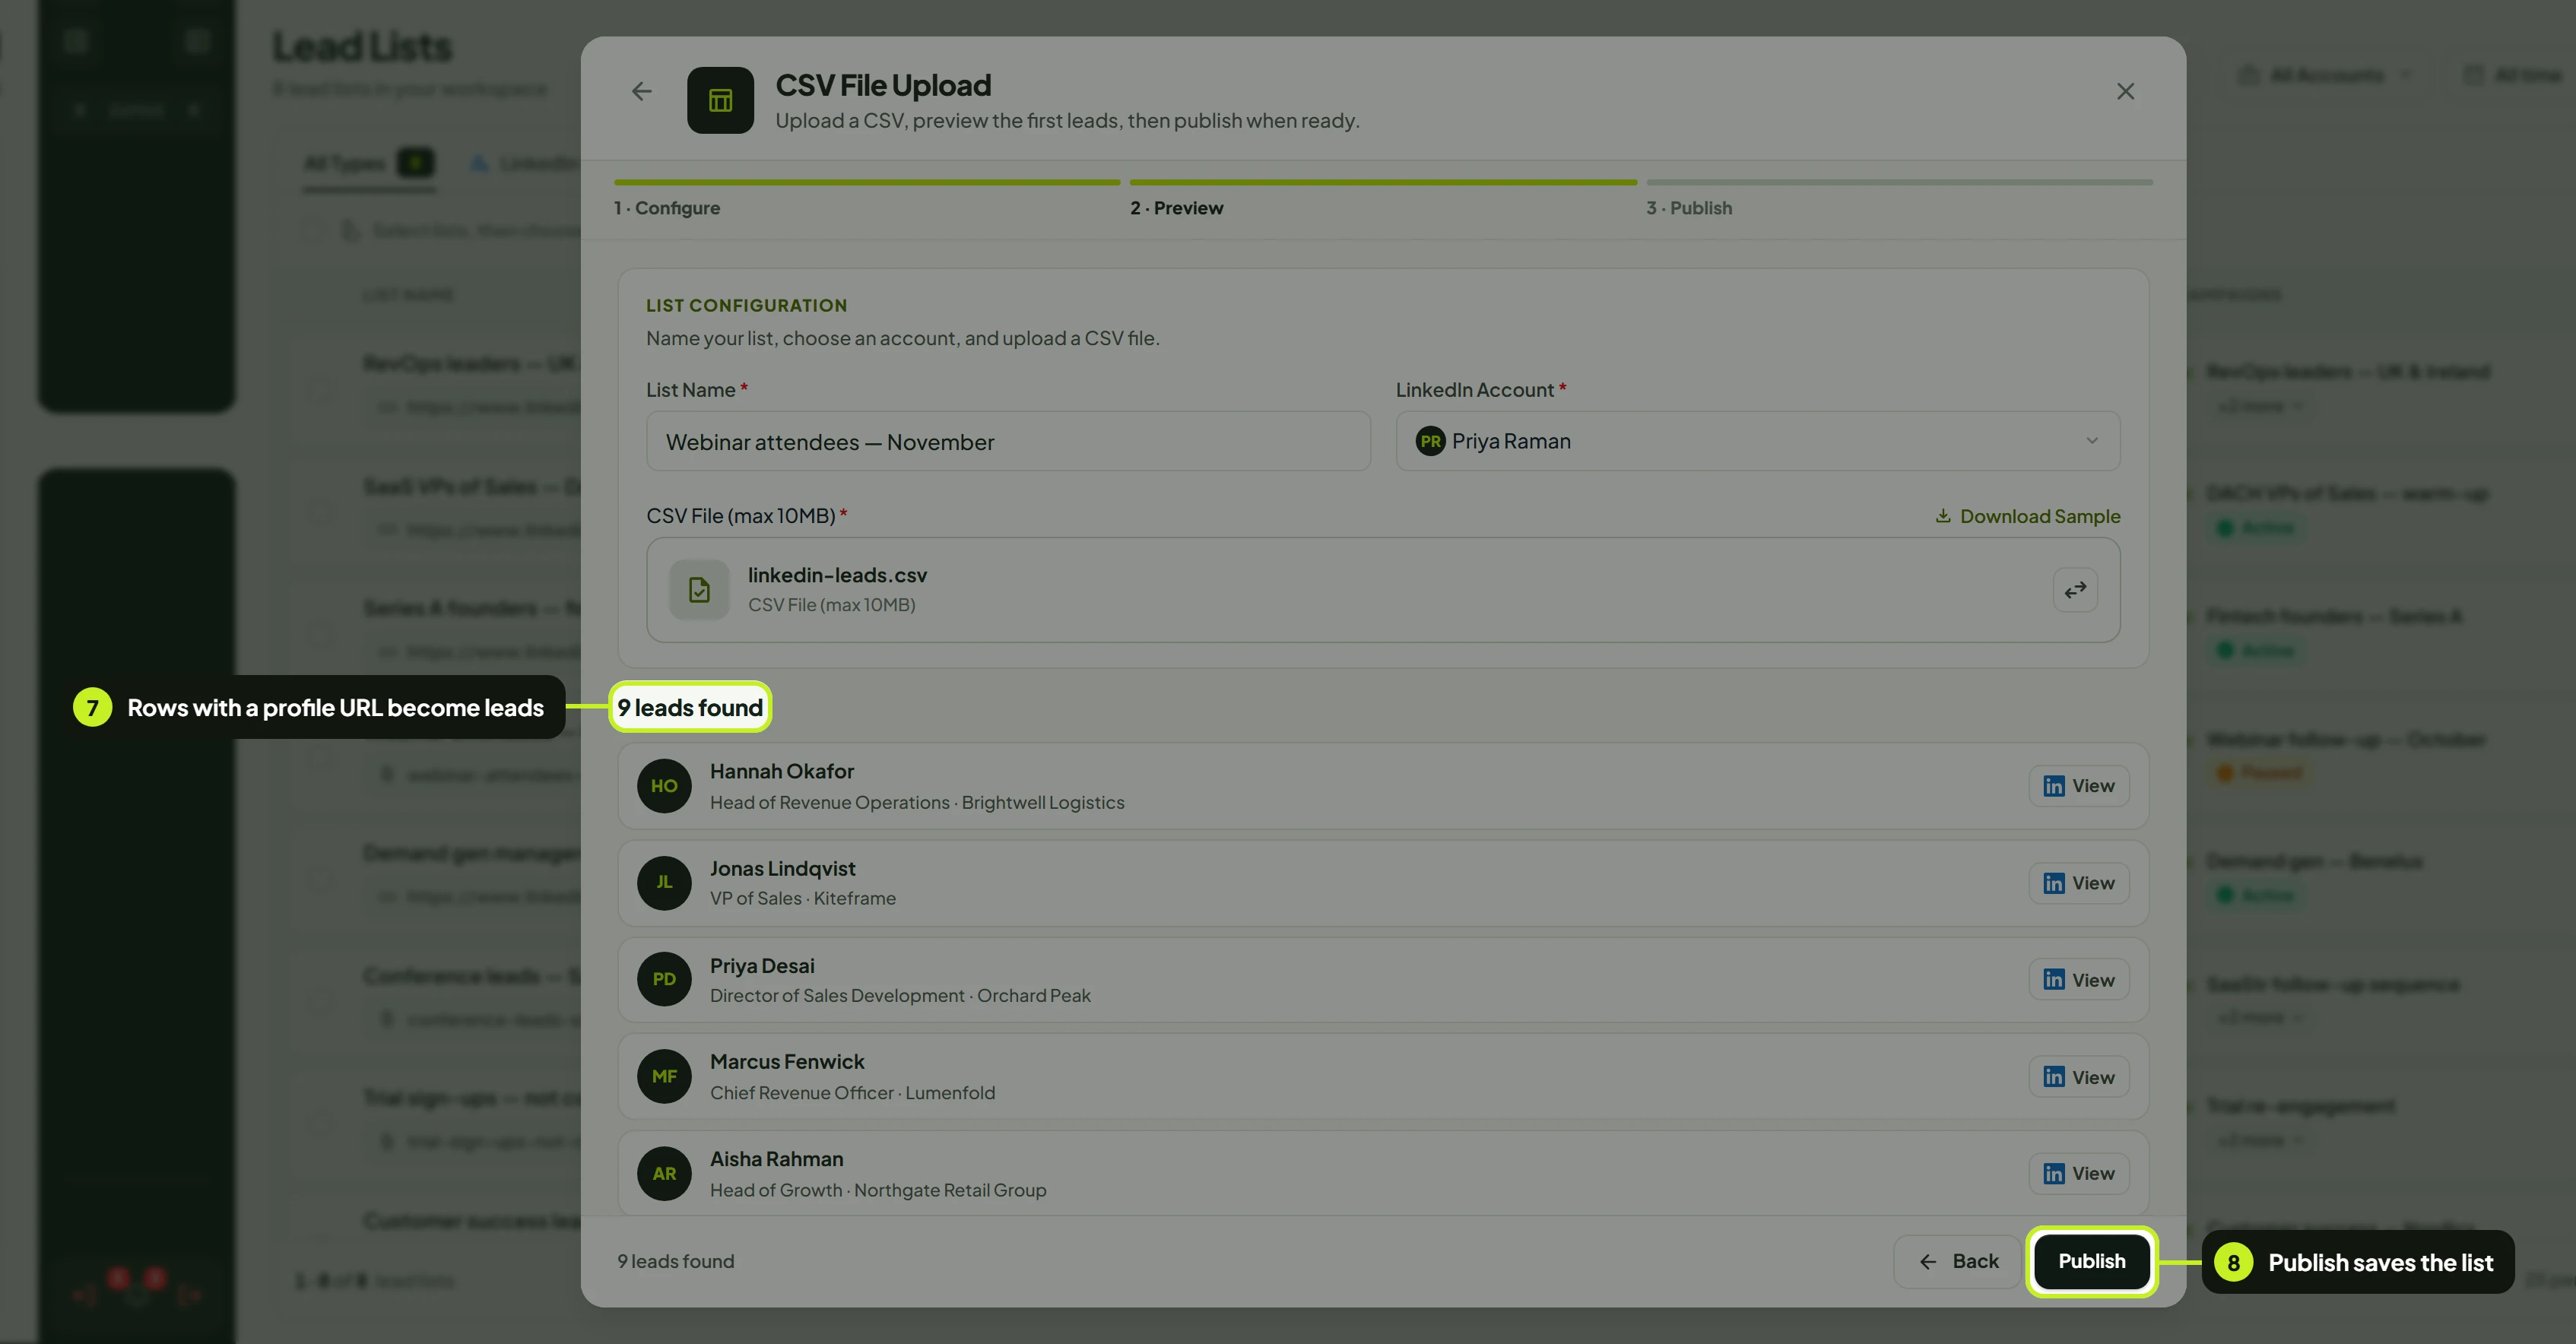
Rows without a LinkedIn profile URL are left out. If a row's LinkedIn URL cell is empty, or holds something that isn't a linkedin.com link with a profile path, that row isn't in the preview and won't be in the list. The count tells you how many rows made it.
Note: In the LinkedIn CSV preview, the Company column shows the lead's job title when you've mapped Job title. Location stays empty until the profiles have been fetched after you publish.
Map an email list
The Email list upload wizard works the same way. The difference is which field is required.
- Enter a List Name. There's no LinkedIn account to choose.
- Click Choose File. Download Sample gives you
sample-email-contacts.csv(email,firstName,lastName,companyName,jobTitle,phone). - In Map your CSV columns, check that Email points at the column with email addresses. It's at the top and it's the only required field. If it's missing, you'll see Select the column that contains email addresses.
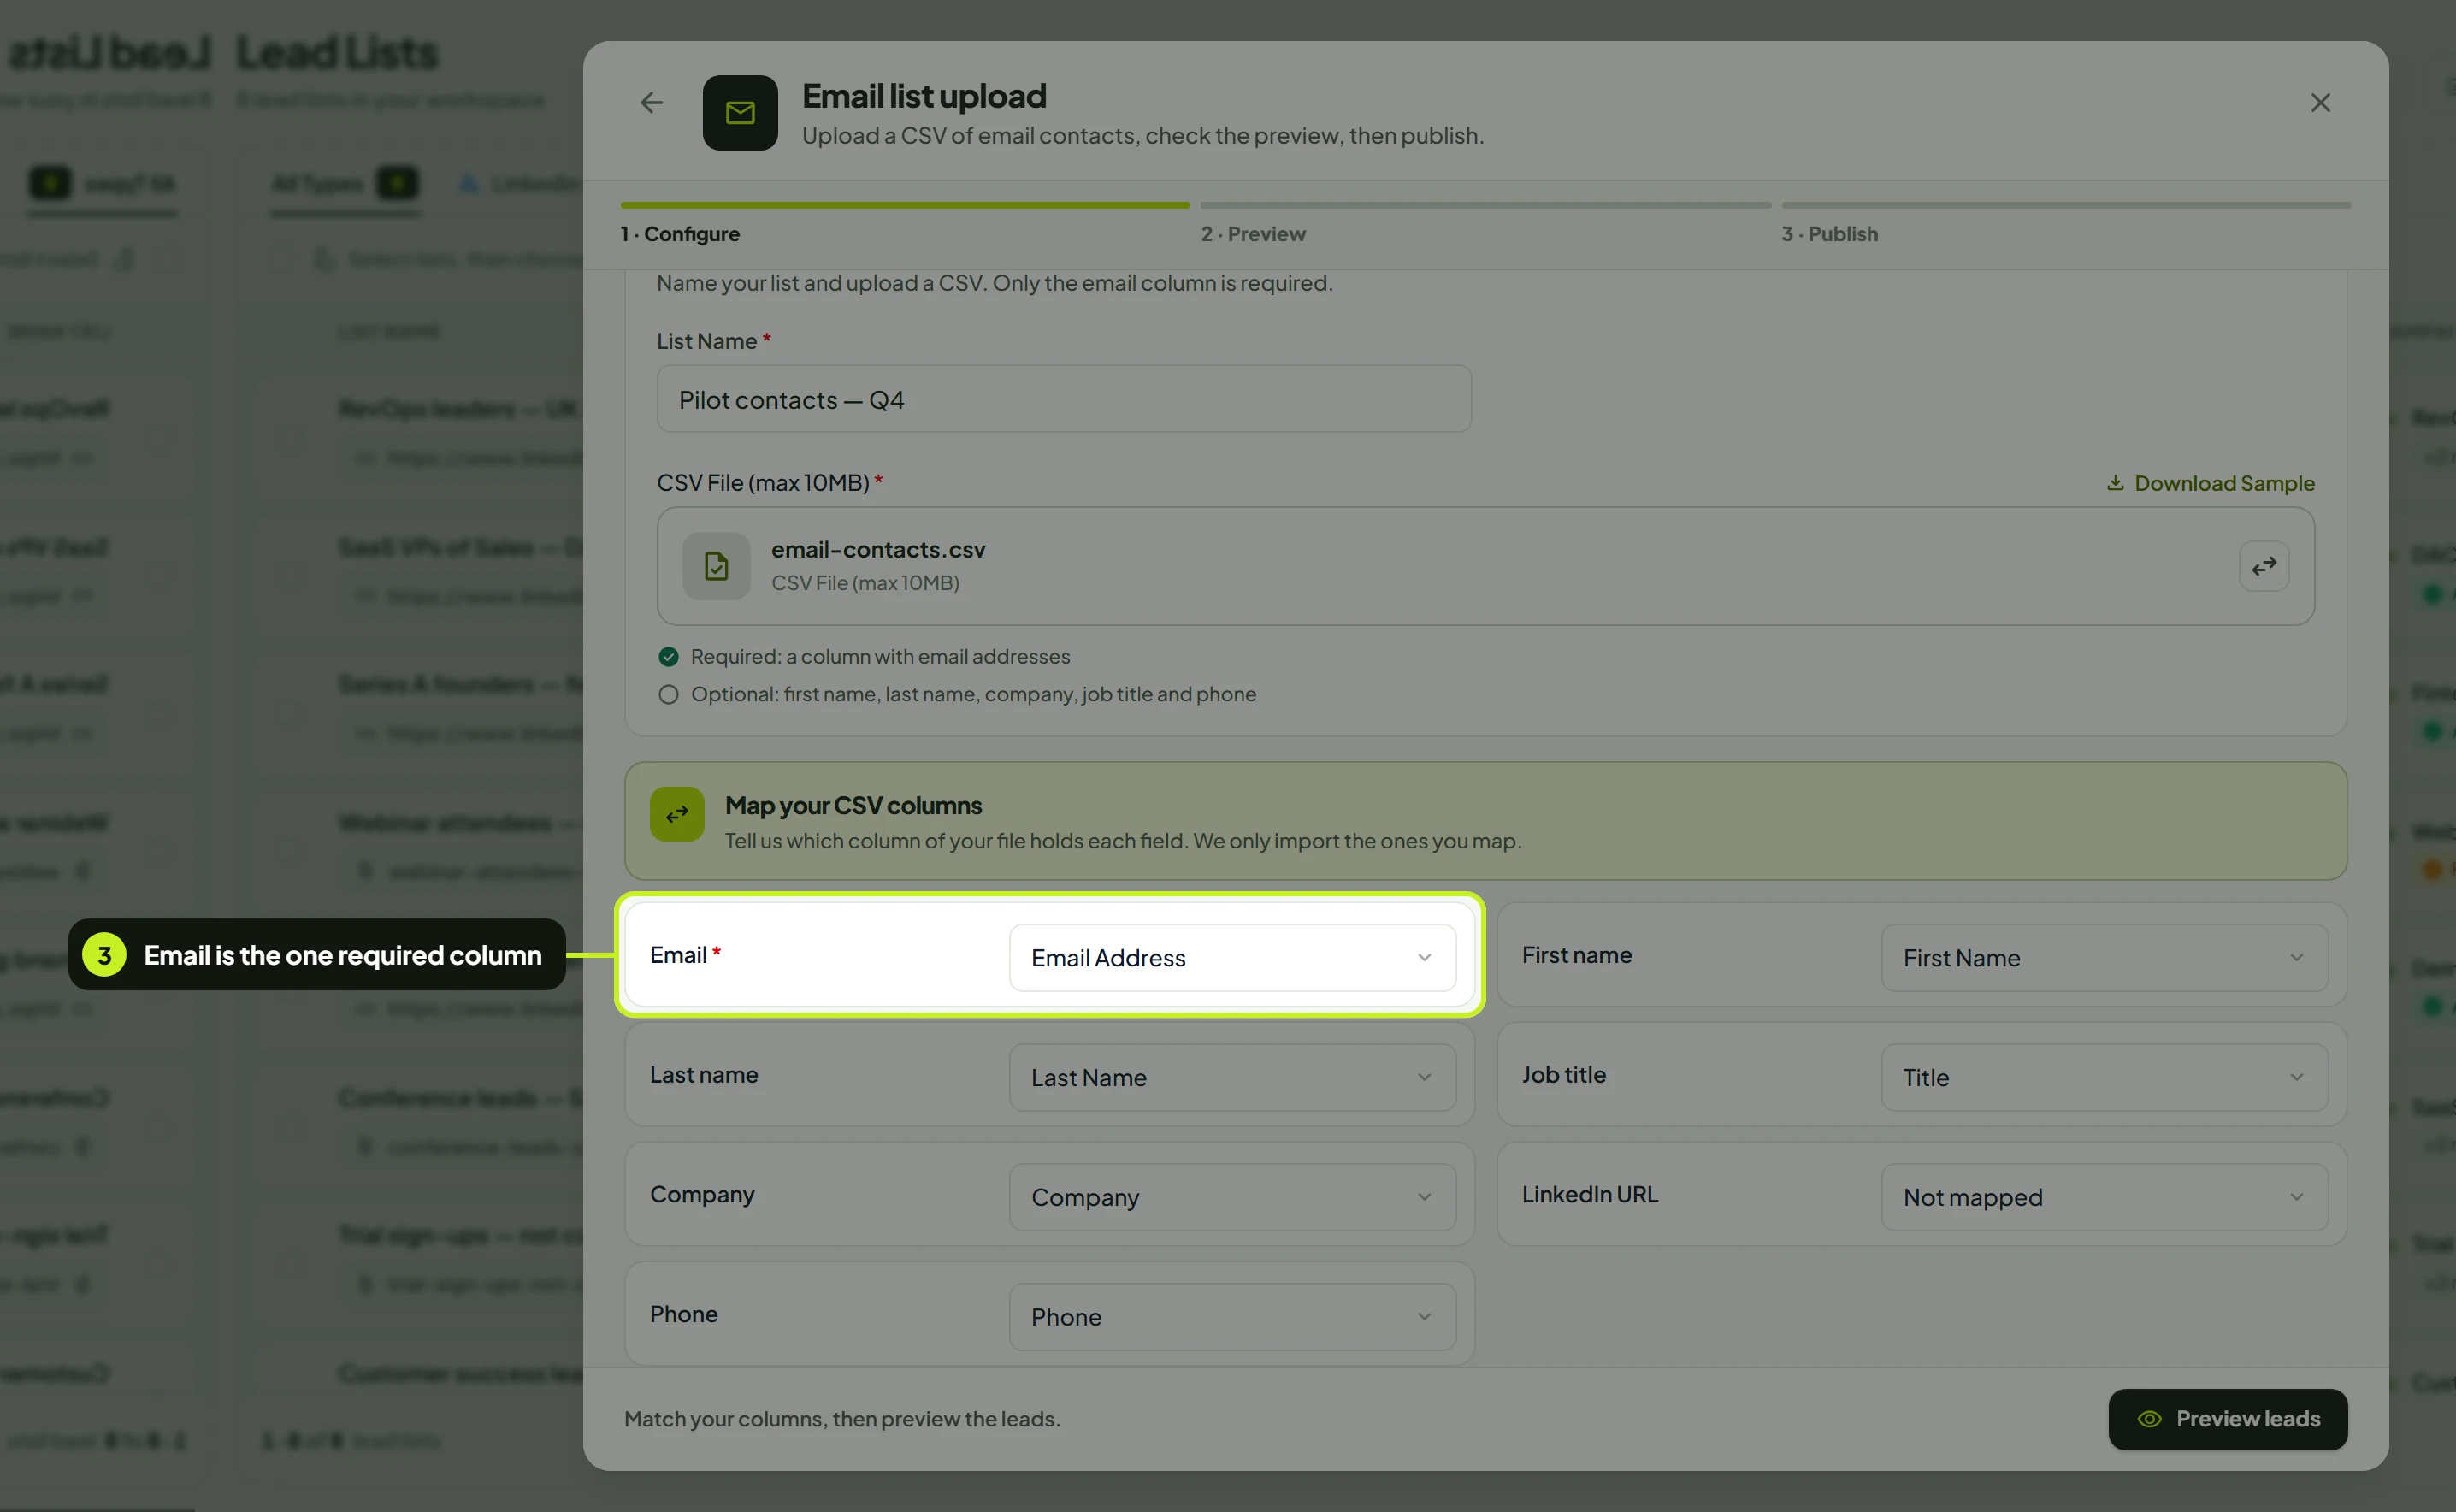
- Map any of the optional fields you have. A LinkedIn URL is accepted, but nothing depends on it.
- Click Preview leads. ReacherPro reads the file and lists each contact with Contact, Company, Job title, Phone and an Email check: Valid, or Bounced if an earlier email to that address bounced (hover it to see the date).
- Click Publish.
A contact with only an email address, and no name, is still imported. You can write to an address on its own.
How automatic matching works
ReacherPro fills in the mapping in three passes, then stops and shows you the result. It never imports without showing you the mapping first.
- Exact header names. Capital letters, spaces and punctuation are ignored, so
LinkedIn Profile URL,linkedin_profile_urlandLinkedInProfileUrlall count as the same header. - Headers that contain a known name. For example,
Contact Phonematches Phone andPerson Linkedin Urlmatches LinkedIn URL. - What's in the column. If LinkedIn URL, Email or Phone is still unmatched, ReacherPro checks the first 50 rows. A column where most filled cells look like LinkedIn links, email addresses or phone numbers (at least seven digits) is matched, whatever it's called.
Headers ReacherPro recognises:
| Field | Headers it recognises |
|---|---|
| First name | First name, Given name, Forename, Fname |
| Last name | Last name, Surname, Family name, Lname |
| Job title | Job title, Position, Title, Role, Headline, Designation |
| Company | Company name, Company, Organisation, Organization, Employer, Account name |
| LinkedIn URL | LinkedIn URL(s), LinkedIn profile, LinkedIn profile URL, Profile URL, Profile link, Public profile URL, LinkedIn, LI URL, URL |
| Email(s), Email address, Work email, Mail. Email lists also recognise Business email and Contact email. | |
| Phone | Phone(s), Phone number, Mobile, Telephone, Tel, Cell |
Rules to know
- One column, one field. Once a column is mapped to a field, it disappears from the other menus. To move it, set the first field to Not mapped or to another column.
- Columns you don't map are ignored. A
Notescolumn, for example, is never imported unless you map it. - Every header needs a name, and names must be unique. Columns with an empty header aren't offered. If two columns share a header, only one of them can be picked, so rename one before you upload.
- Wide files are searchable. When a menu has more than seven columns to choose from, it shows Search columns....
- Changing the mapping clears the preview. Click Preview leads again before you publish.
- To use a different file, click Choose Different File. The mapping is worked out again for the new file.
- The file can't be changed after you publish. Editing a CSV list later only lets you rename it or change its LinkedIn account. See Manage, edit and delete lists.
Common problems
| What you see | What it means | What to do |
|---|---|---|
| Only CSV files are supported | The file isn't a .csv. |
In Excel or Google Sheets, export or download it as CSV, not .xlsx. |
| CSV file must be 10MB or smaller | The file is too big. | Split it into smaller files and import them as separate lists. |
| The selected CSV file is empty | The file has no content. | Check you exported the right sheet. |
| Could not read the CSV file. Check the format and try again. | The file isn't valid CSV, for example a broken export. | Open it in a spreadsheet app, save it as CSV again, and retry. |
| Select the column that contains LinkedIn profile URLs | LinkedIn URL isn't mapped. | Pick the column with linkedin.com/in/… links. |
| No valid LinkedIn profile URLs were found in the selected column | The column mapped to LinkedIn URL has no profile links. | Map the right column, or add full profile URLs to your file. |
| Select the column that contains email addresses | Email isn't mapped on an email list. | Pick the column with the addresses. |
| Fewer leads than rows in your file | Rows without a valid LinkedIn profile URL were left out. | Fill in those rows' profile URLs and import them as another list. |
| A field shows Not mapped but your file has that data | The header wasn't recognised. | Open the field's menu and pick the column yourself. |
| A column isn't in a field's menu | Another field is already using it, or its header is empty or repeated. | Free it up on the other field, or rename the header in your file. |
| Publish is disabled | There's no preview yet, or the mapping changed after previewing. | Click Preview leads. |
Next: See and tidy your imported lists in Manage, edit and delete lists.