Browse docs
Webhooks
Send replies, accepted invites and campaign events to your own endpoint as they happen: add a webhook, pick events, use the signing secret, pause or edit it.
Updated
On this page
A webhook sends an event from ReacherPro to an address you own each time something happens — a lead replies, an invite is accepted, a campaign finishes. Use it to feed your CRM, alert your team, or start your own automations.
How it works
- You add a webhook with an Endpoint URL and the Events you care about.
- When one of those events happens, ReacherPro sends a
POSTrequest with a JSON payload to your endpoint. - Each webhook has its own Signing secret, so your endpoint can check the request came from ReacherPro.
- You can pause deliveries at any time without deleting the webhook.
Before you start: You need a public
https://endpoint that answers quickly — your automation tool's inbound webhook, your CRM's webhook receiver, or your own server.
Find your way around
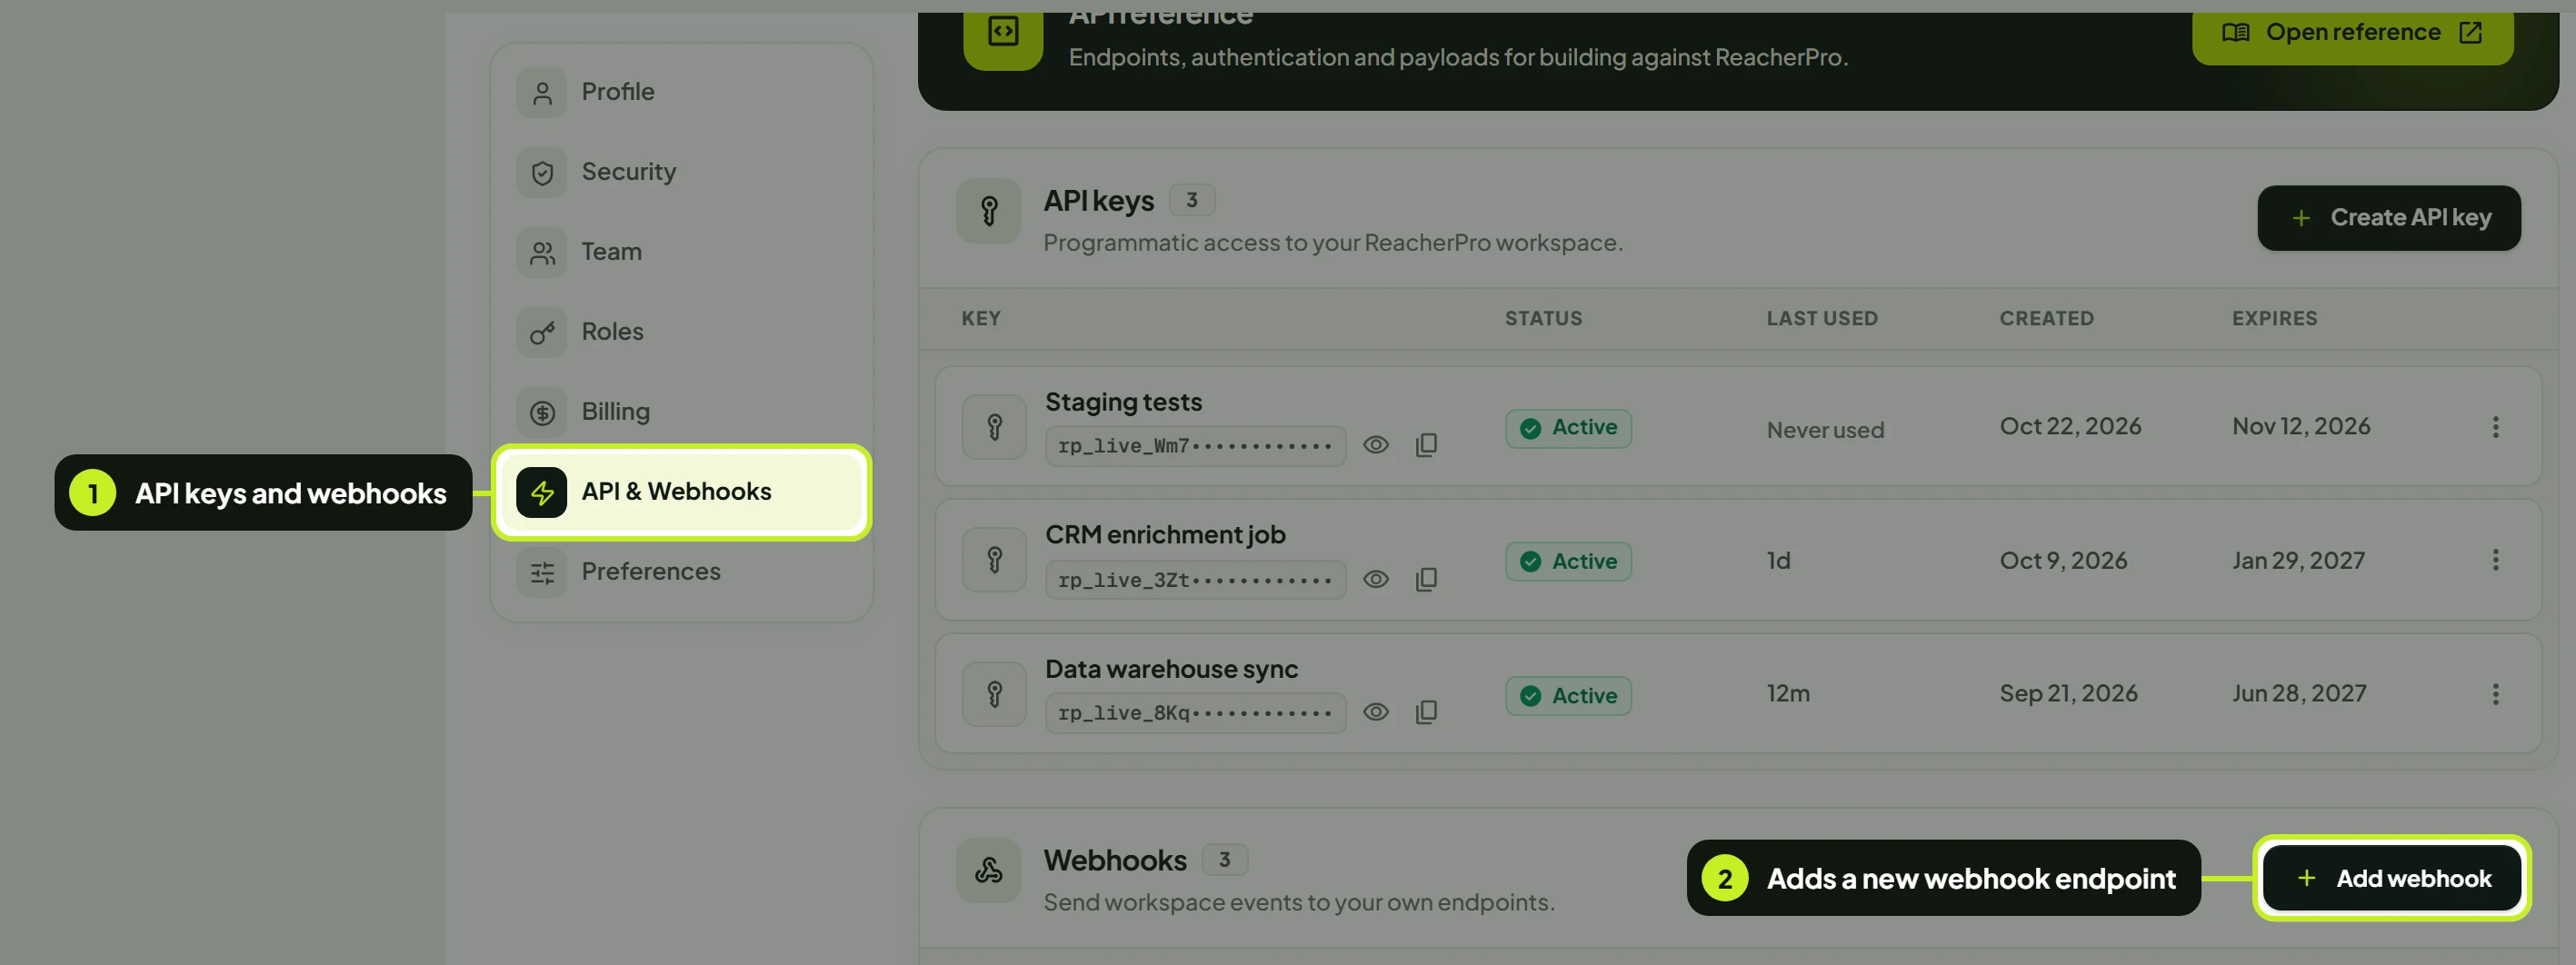
Settings > API & Webhooks has three cards: API reference, API keys and Webhooks. The Webhooks card lists every webhook in the workspace, with a count next to the title.
| Column | What it shows |
|---|---|
| Webhook | The name, and the endpoint address with a copy button. |
| Events | One chip per event it sends. Hover a chip for a description. |
| Status | Active — deliveries are on. Paused — nothing is sent. |
| Enabled | A switch to pause or resume deliveries. |
| Last delivery | How long ago the last event was sent, or Never triggered. |
| Signing secret | The secret, hidden as whsec_••••••, with show and copy buttons. |
Add a webhook
- In the sidebar, click Settings, then open the API & Webhooks tab.
- On the Webhooks card, click Add webhook.
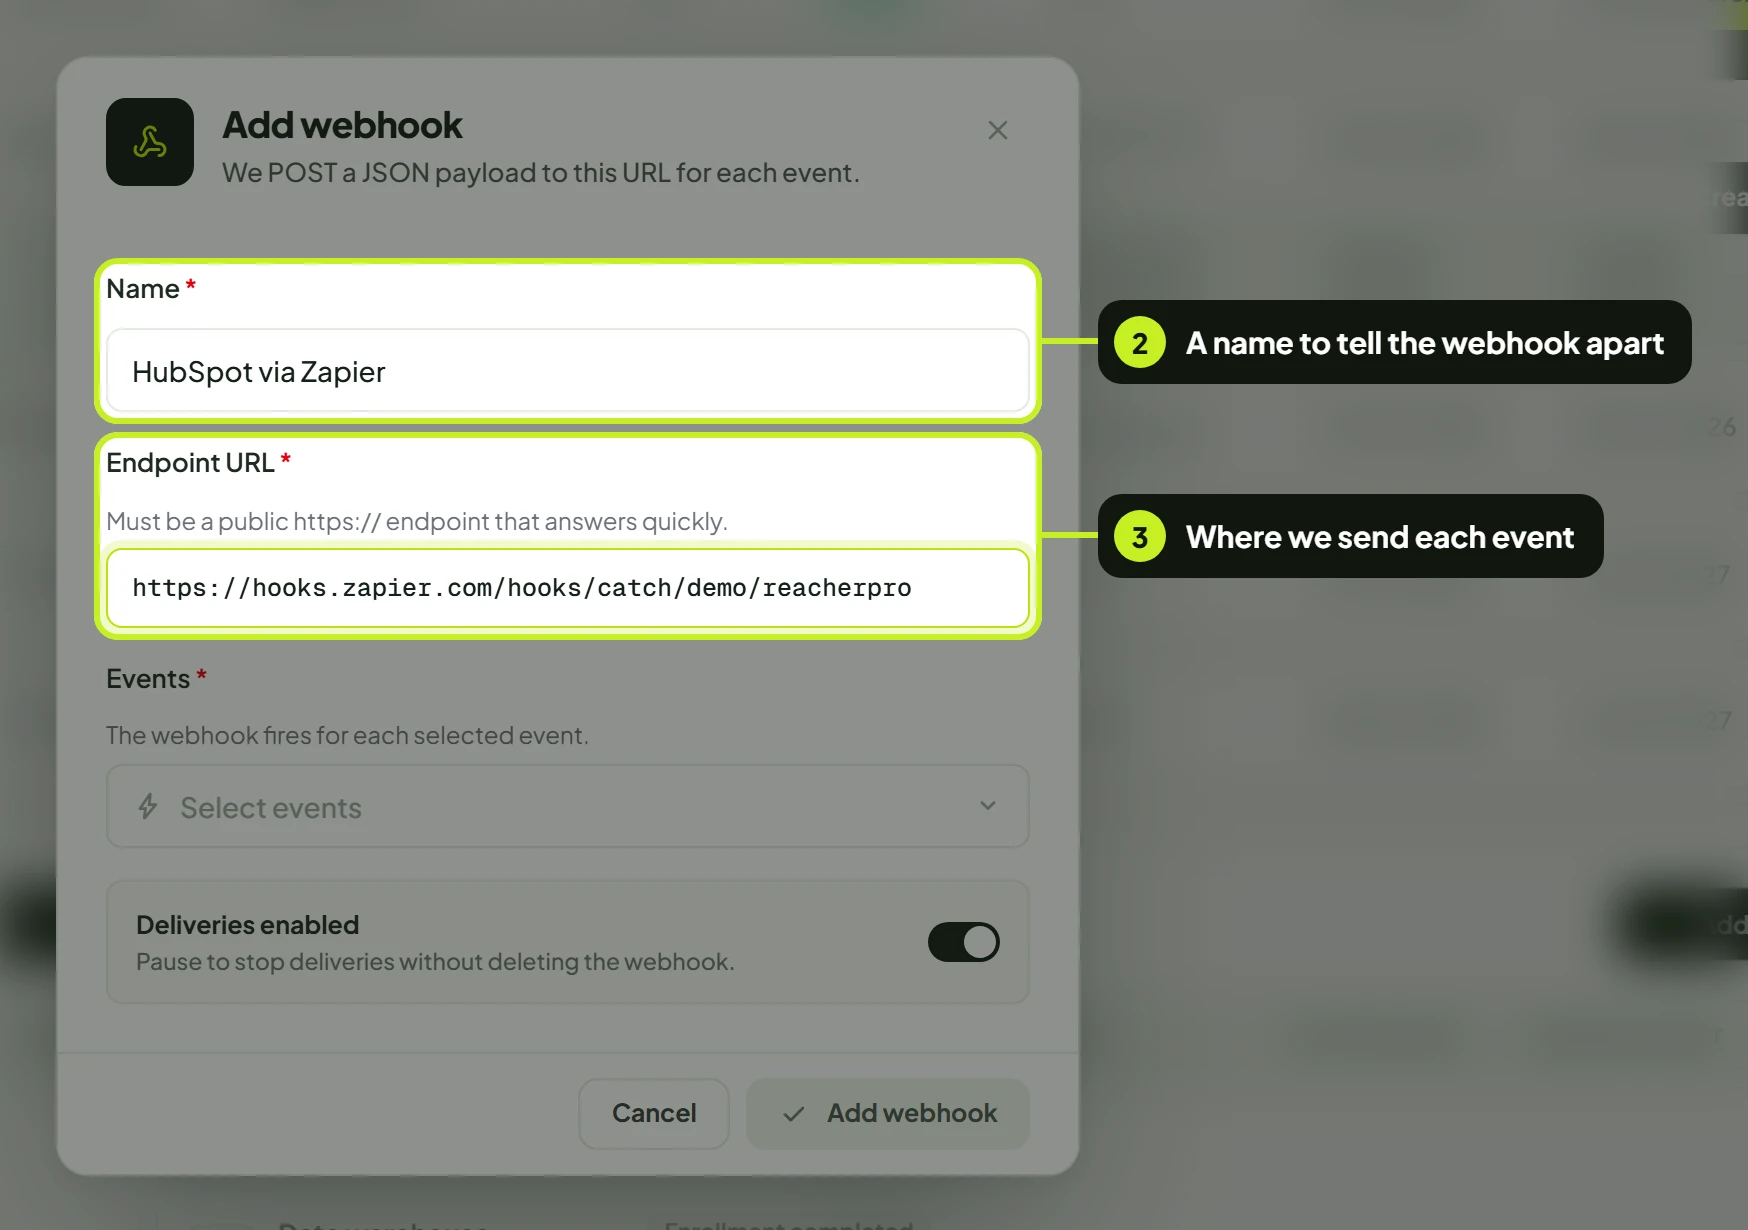
- Fill in the form. Every field marked * is required.
| Field | What it does | Example |
|---|---|---|
| Name | A label so you can tell webhooks apart. | Reply sync |
| Endpoint URL | Where ReacherPro sends events. Must be a public https:// address that answers quickly. |
https://hooks.acme.io/reacherpro/replies |
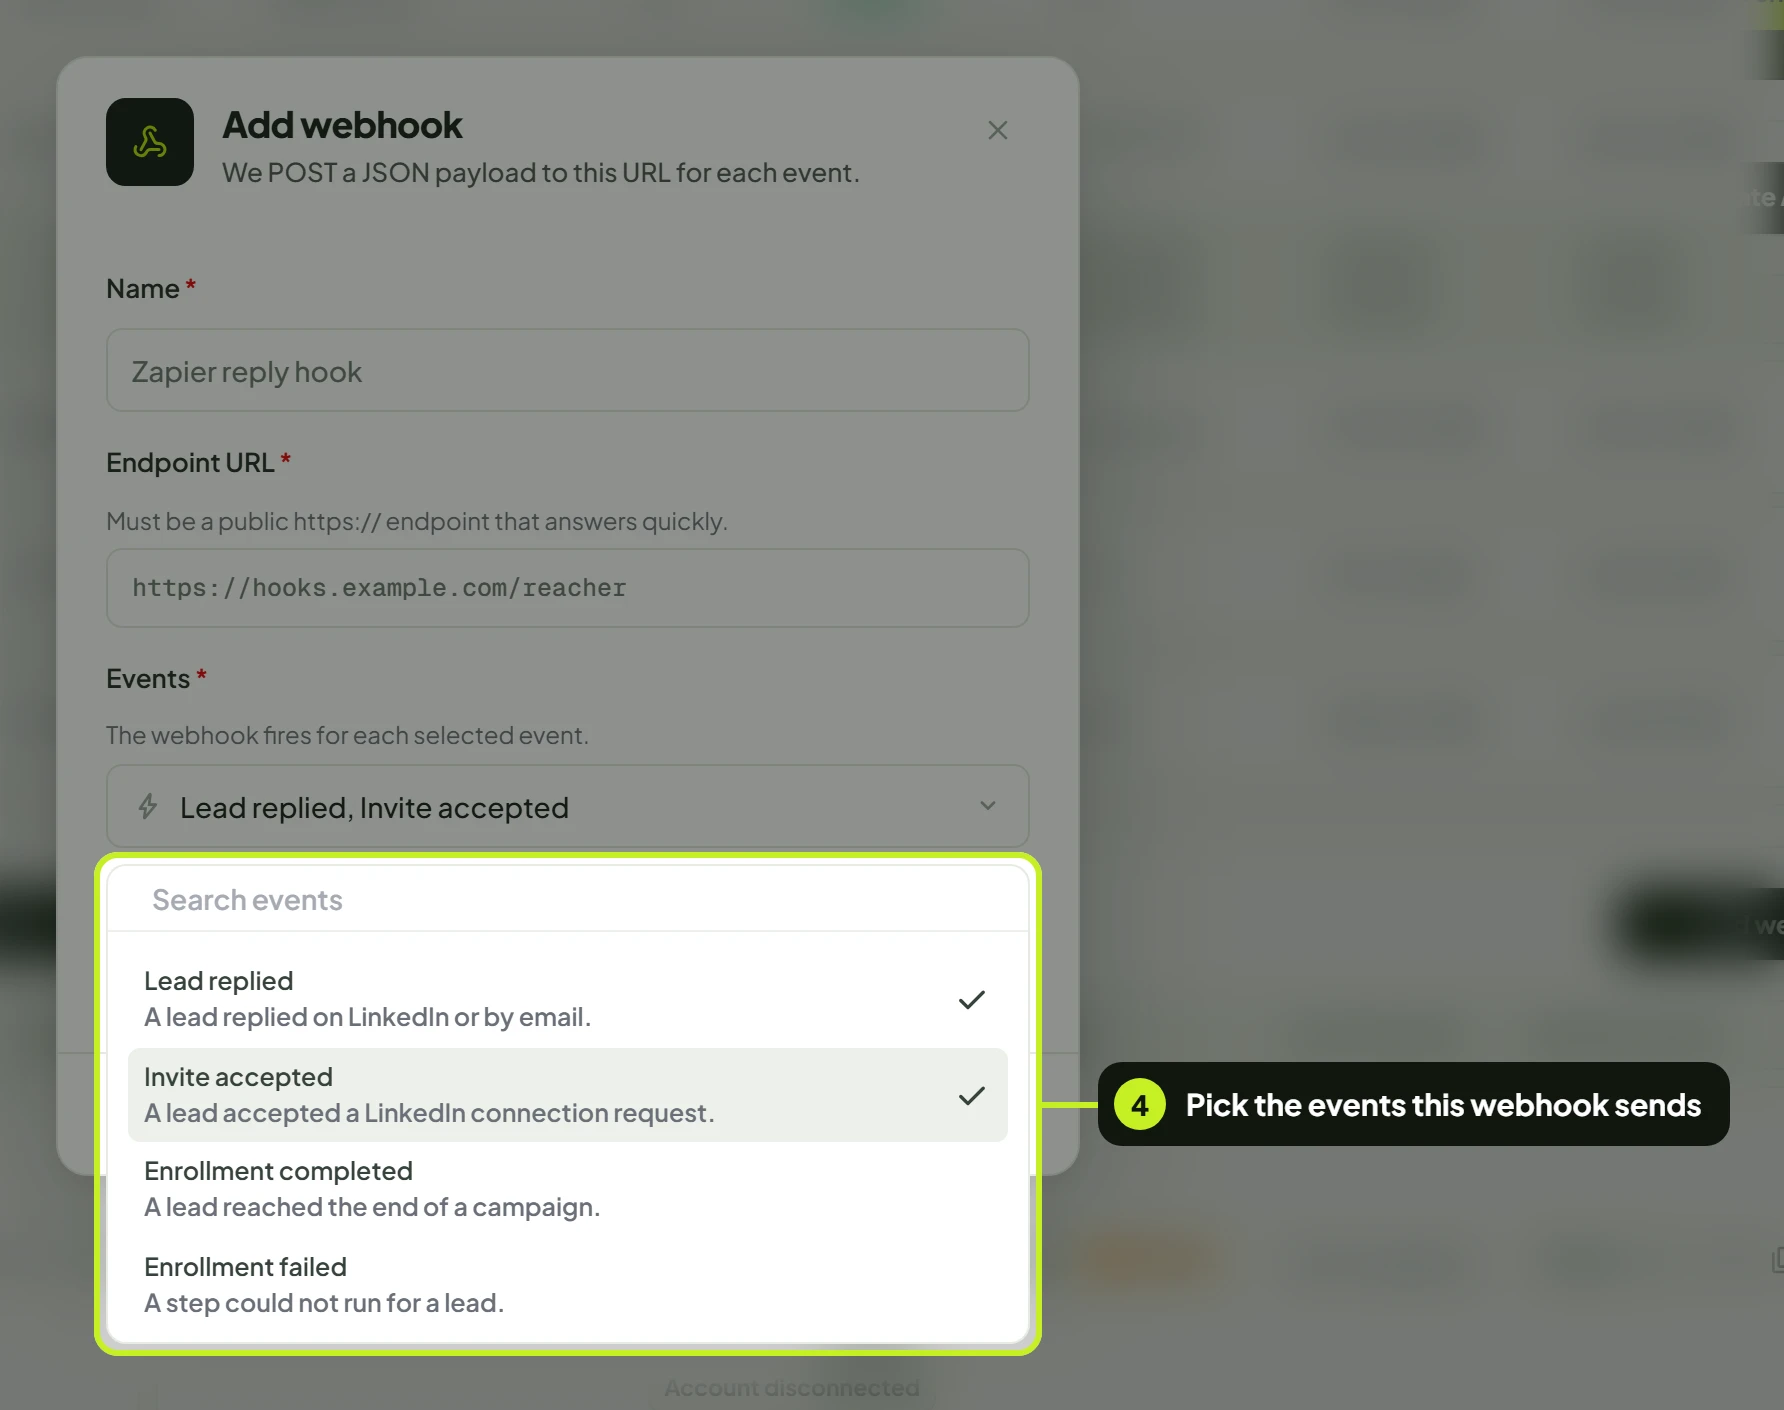
| Events | The events this webhook sends. Pick at least one. | Lead replied, Invite accepted |
| Deliveries enabled | On: events are sent. Off: the webhook is saved but paused. | On |
- Open Events and click each event you want. Use Search events to filter the list. Selected events show a check mark.
- Leave Deliveries enabled on to start receiving events straight away.
- Click Add webhook.
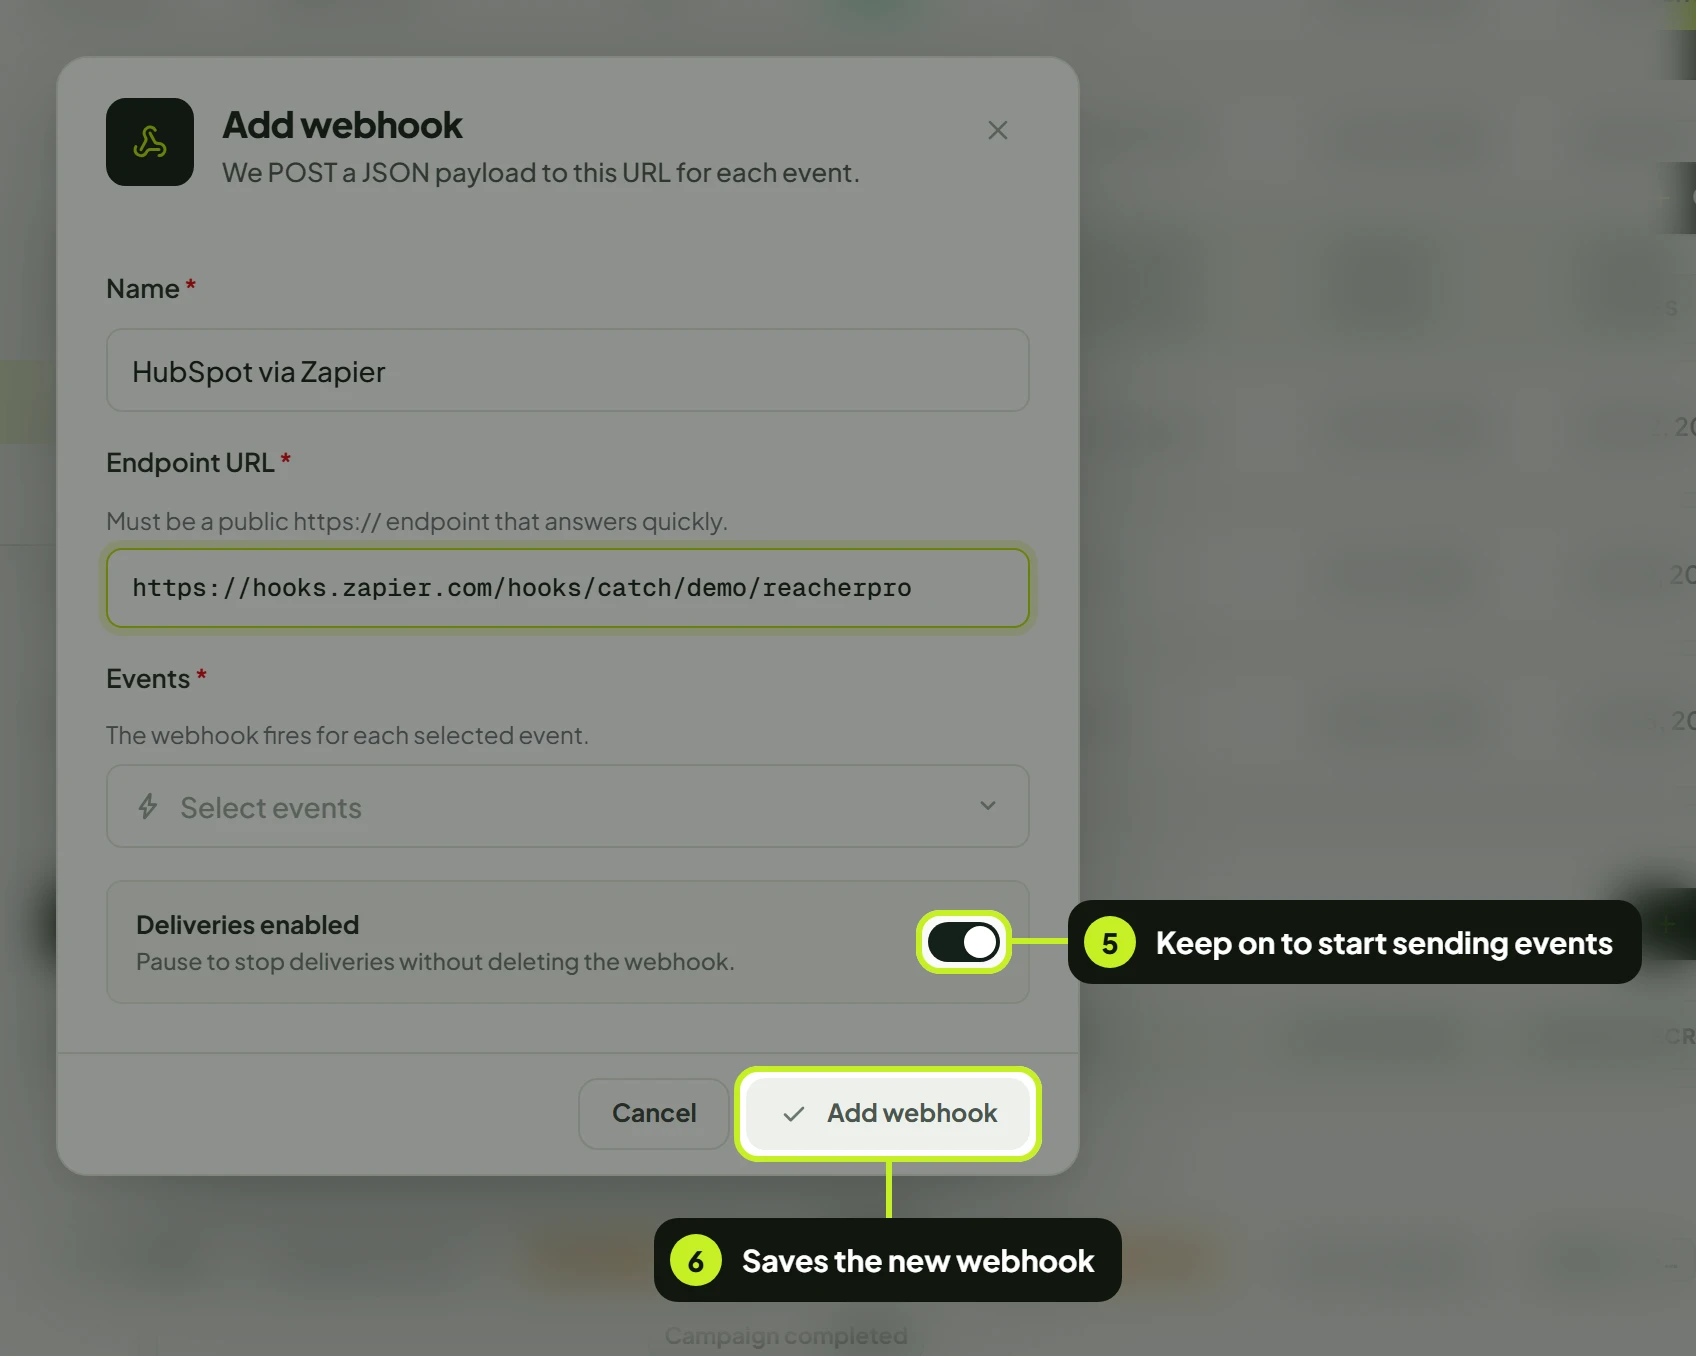
You'll see Webhook added — Your endpoint will receive the selected events. The webhook appears in the table.
Events
| Event | Fires when |
|---|---|
| Lead replied | A lead replied, on LinkedIn or by email. |
| Invite accepted | A lead accepted a connection request. |
| Enrollment completed | A lead reached the end of a campaign flow. |
| Enrollment failed | A lead stopped on a step that could not be recovered. |
| Campaign completed | A campaign finished every lead it had. |
| Account disconnected | A LinkedIn account needs reconnecting. |
Tip: A campaign step can also send a lead's data to a webhook mid-sequence — add a Notify Webhook step. See Build and launch a campaign.
Check a webhook
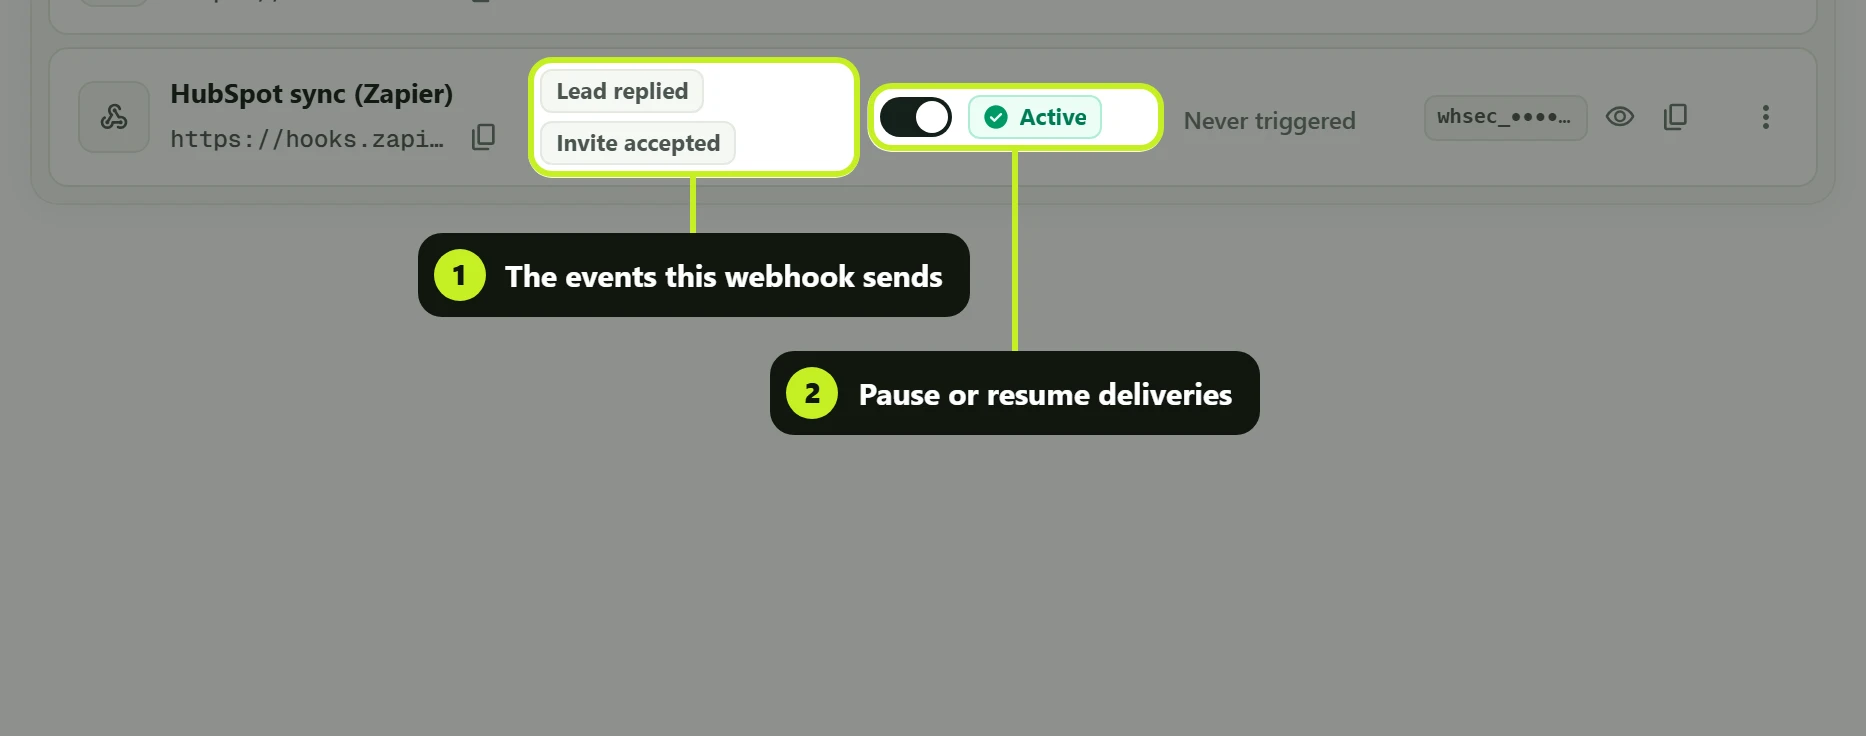
- Events shows what the webhook sends.
- Enabled pauses or resumes deliveries. Hover it to see Pause deliveries or Resume deliveries.
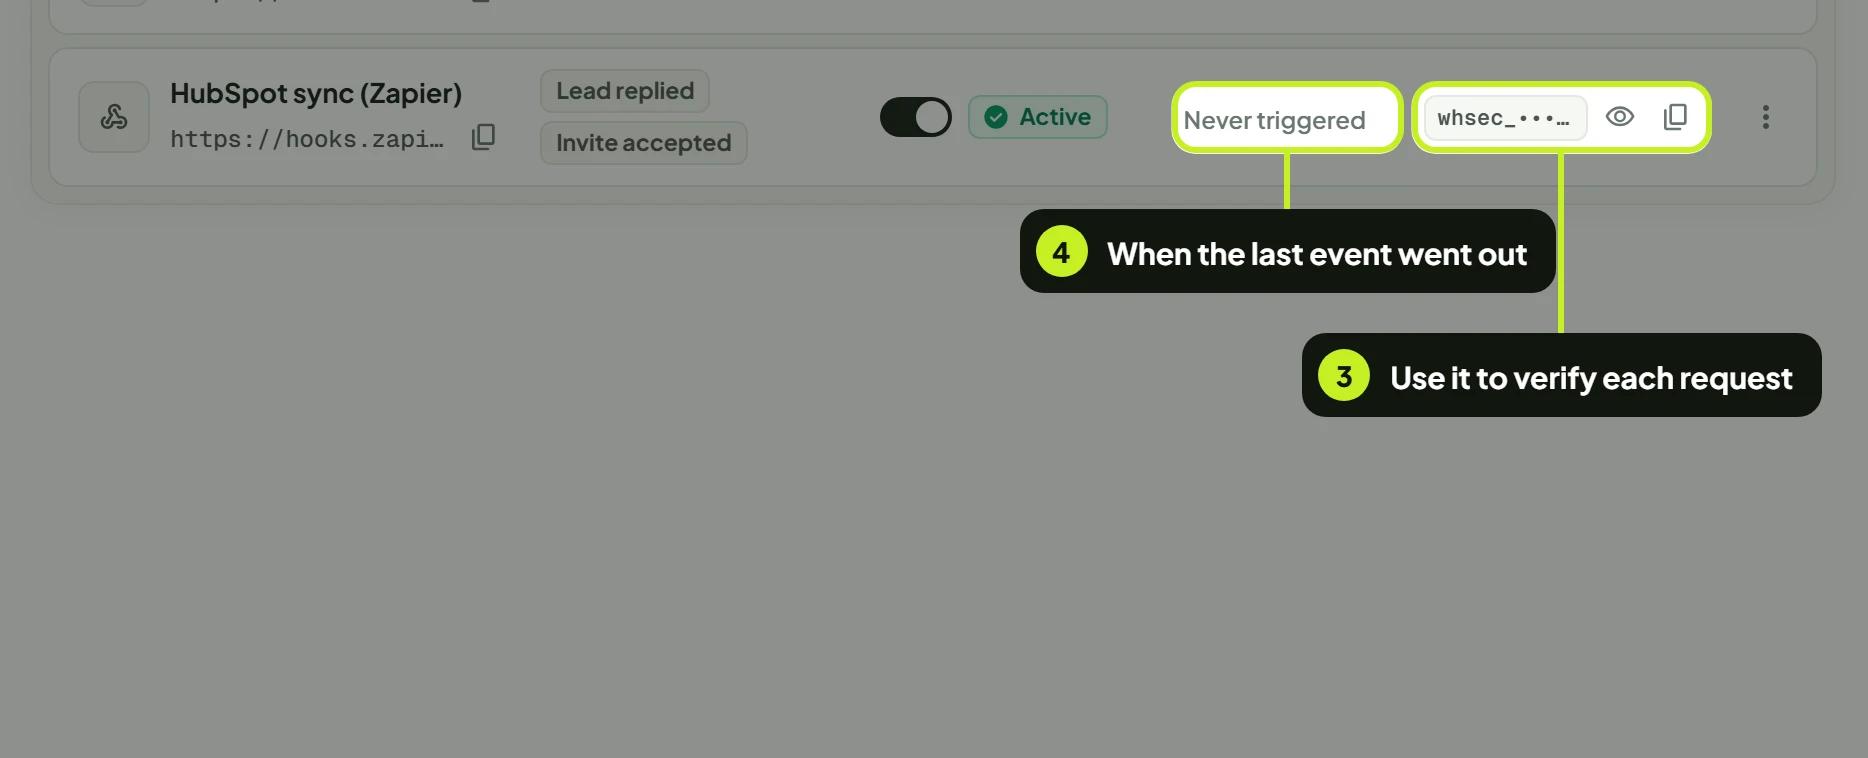
- Signing secret: click the eye to show it, or the copy button to copy it. The button ticks and its tooltip reads Copied for a moment.
- Last delivery shows when an event was last sent. Hover the time for the exact date.
Verify requests with the signing secret
Store the signing secret on your server, never in a browser or a public repository. Use it to confirm each request came from ReacherPro before you act on it, and reject requests that don't match. How the signature is sent and calculated is described in the API reference — open it from API reference > Open reference on the same page.
Pause, edit or delete a webhook
- Pause: turn off the Enabled switch. Status changes to Paused and nothing is sent until you turn it back on.
- Edit or delete: click the ⋮ menu at the end of the row.
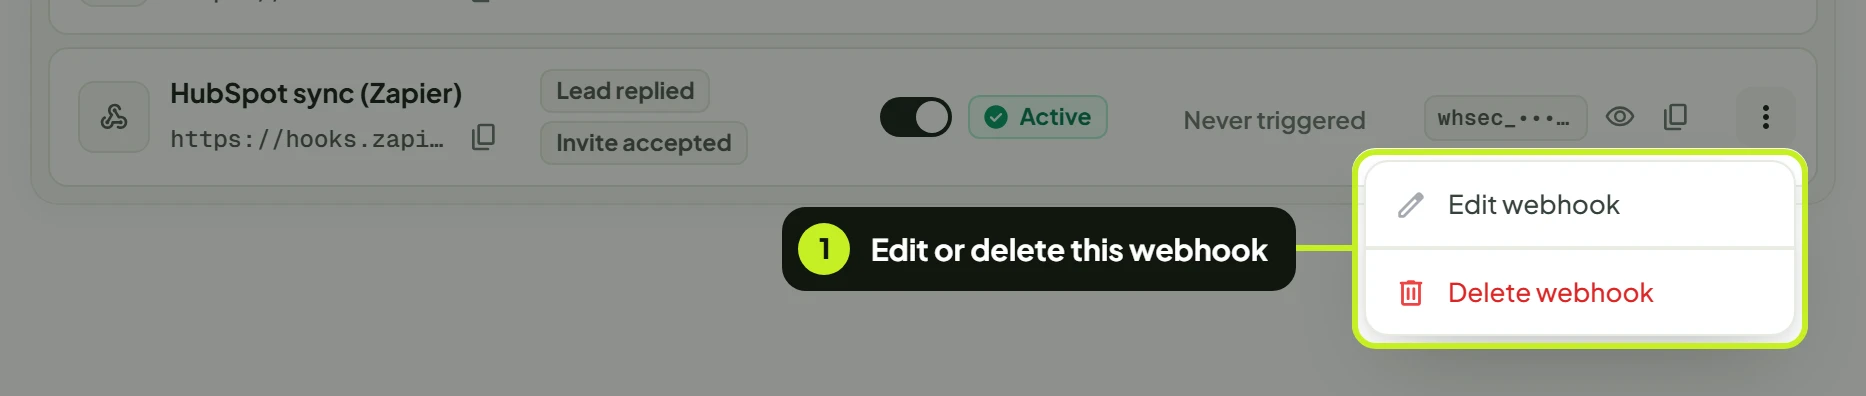
Edit webhook opens the same form, titled Edit webhook. Change what you need and click Save changes. You'll see Webhook updated when it's saved.
Delete webhook asks Delete this webhook? and explains that it stops receiving events. Click Delete webhook to confirm, or Cancel. You'll see Webhook deleted.
Tip: If you only need to stop deliveries for a while, pause the webhook instead of deleting it. Its name, events and secret stay as they are.
Common problems
| What you see | What it means | What to do |
|---|---|---|
| Give the webhook a name. | Name is empty. | Enter a name. |
| Enter a valid http:// or https:// URL. | Endpoint URL isn't a full web address. | Paste the whole address, starting with https://. |
| Select at least one event. | No events are picked. | Open Events and pick at least one. |
| Could not save the webhook. Please try again. | The webhook wasn't saved. | Check the address and try again. |
| Could not delete the webhook. Please try again. | The webhook is still there. | Try again from the row menu. |
| Never triggered under Last delivery | None of the selected events has happened yet. | Wait for the next one, or add more events. |
| Your endpoint gets nothing | The webhook is Paused, or doesn't include that event. | Turn on Enabled and check Events. |
| Add webhook is greyed out with a tooltip | Your role can't create webhooks. | Ask a workspace admin to update your role. |
Next: Let your tools read from ReacherPro with API keys.