
Browse docs
Steps and conditions reference
Every step and condition you can add to a sequence — what it does, why you'd use it, its settings and defaults, and how timing and Yes / No branches work.
Updated
On this page
A sequence is the list of steps a campaign runs for each lead. Actions do something (visit a profile, send an invite, send an email). Conditions check something (did they accept? did they reply?) and send the lead down a Yes or a No branch. This page covers every one of them, with its settings and defaults.
To add steps for the first time, start with Build and launch a campaign. The AI options on message steps have their own page: AI writing settings.
How it works
- Each sending day, the campaign starts new leads, up to its Daily Prospect Limit (see Launch settings and daily limits).
- The first step runs after its wait, counted from When a lead enters the campaign.
- Each next step waits its own delay, counted from After the previous step, then runs.
- At a condition, the lead waits for the check, then follows Yes or No. Each branch has its own steps.
- When a lead reaches the end of its branch, the sequence is finished for that lead.
Every lead moves through the sequence on its own, so two leads can be at different steps on the same day.
Before you start
- Open a campaign. Its sequence canvas sits under the setup sentence. See Build and launch a campaign.
- Notify Webhook needs a webhook. See Webhooks.
- Send Email needs a connected inbox. See Connect an email inbox.
Find the step you need
Click Add step in the toolbar, or a + on the canvas, to open Add a step.
- Switch between All steps, Actions (12) and Conditions (6), or type in Search steps….
- Steps are grouped by what they're for: Engagement, Outreach, Housekeeping, Integrations and Conditions.
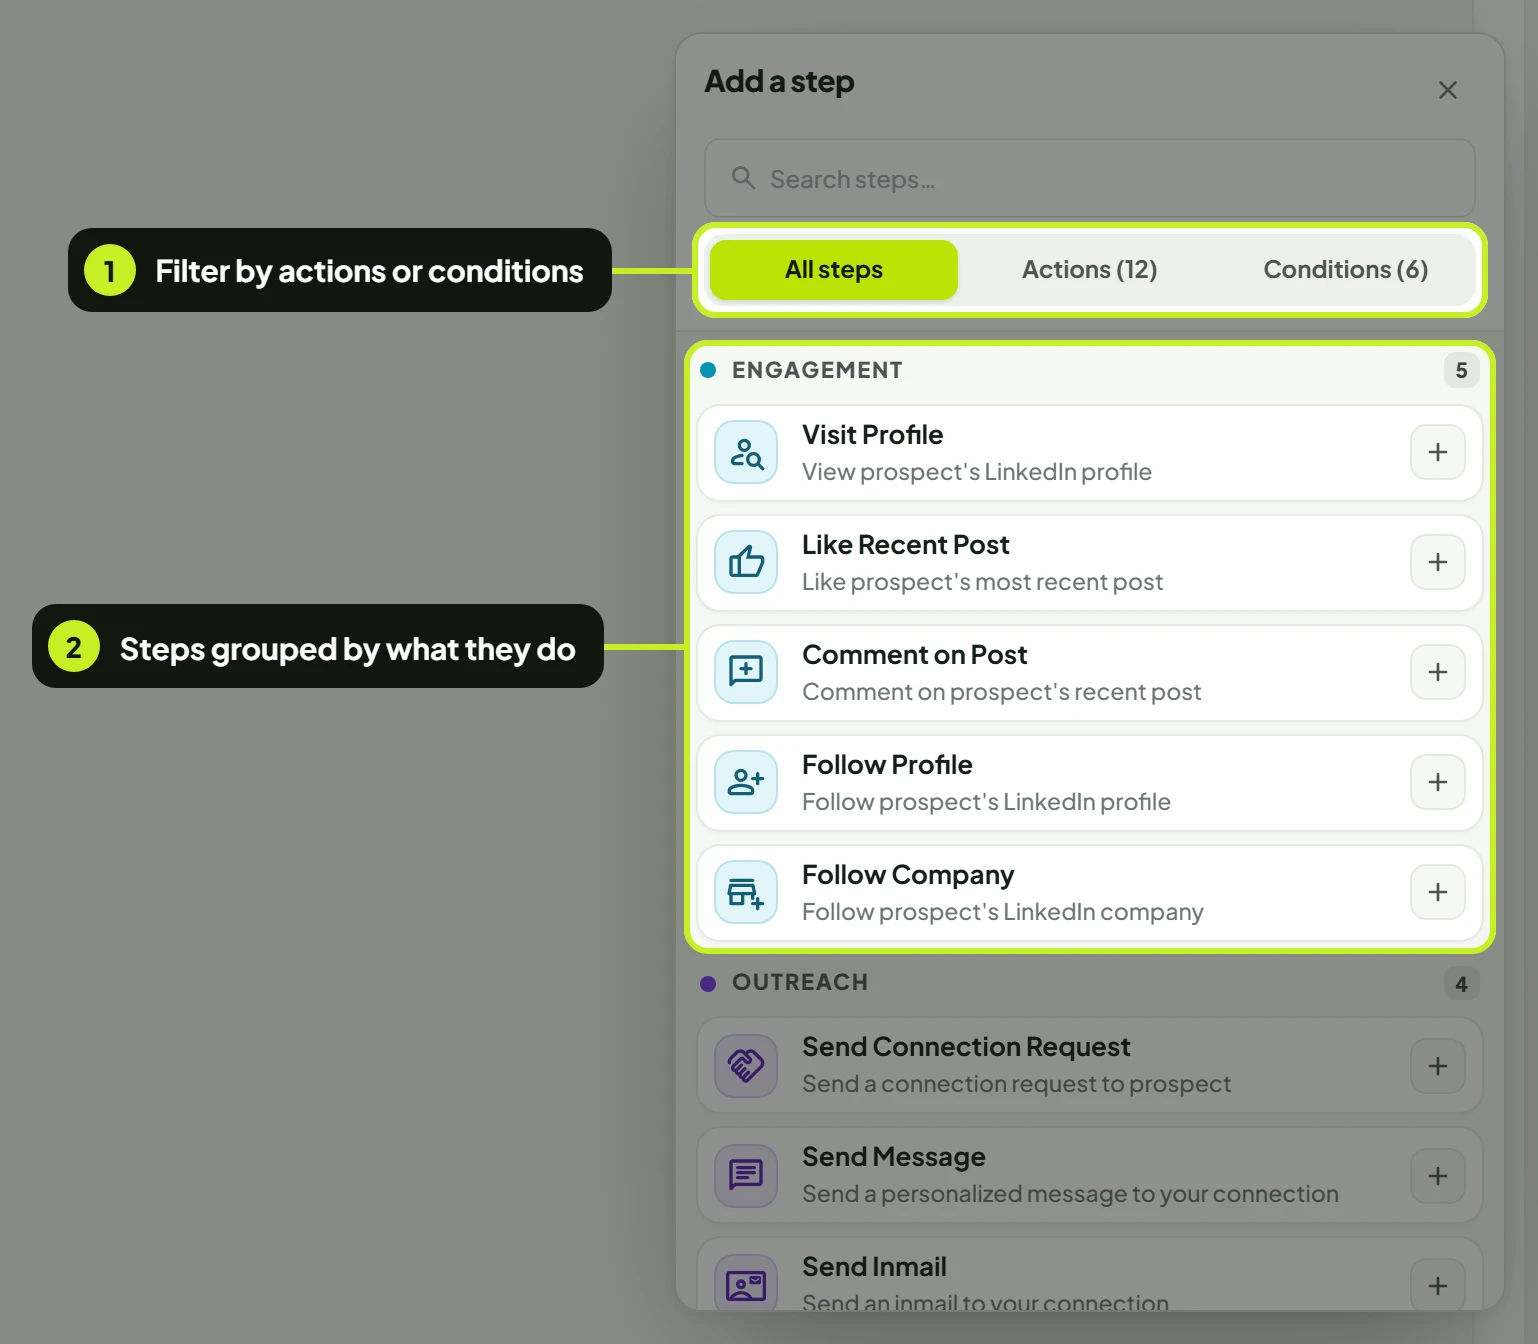
An Email campaign only lists the steps that work by email: Send Email, Add/Update Tag, Notify Webhook, Replied via Email?, Email Opened? and Link Clicked in Email?.
Read a step on the canvas
- Each card shows the step's name, its group, an AI badge when the AI writes its message, and its wait (for example Wait for 1 day, or Check after 3 days on a condition).
- A condition splits into a Yes and a No branch. Click the + on a branch to add a step there.
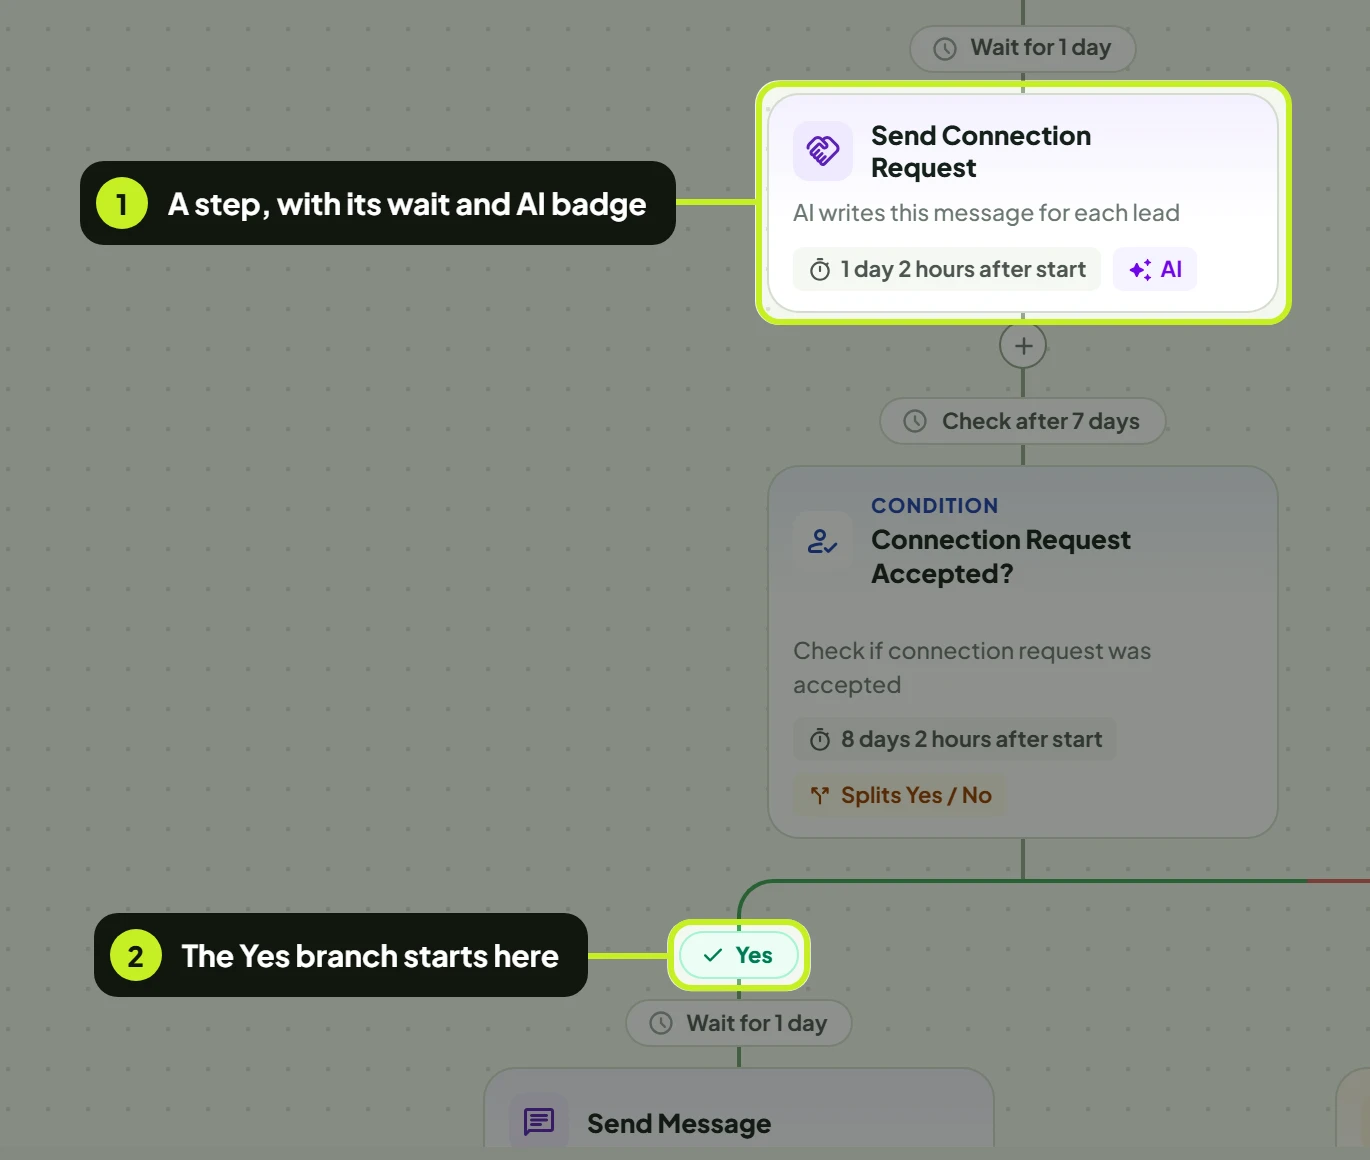
Click a card to open its settings in a panel on the right. Changes apply to the card as you edit (press Ctrl+Z to undo); click Done to close the panel. Nothing is stored until you click Save draft or Save changes.
Scroll or drag the canvas to move around, hold Ctrl (⌘ on a Mac) and scroll to zoom, use Fit to screen to see the whole sequence, and Back to the start to return to the top. Zoomed out, each step shows just its name. Each step's timing reads in plain words, for example 2 hours after start, counted from when the lead was enrolled.
A sequence needs at least two steps. Until it has two linked steps, Sequence has steps stays unticked under Before launch and the campaign can't launch.
Timing: the wait before every step
Every step has a wait. It's the first thing in each step's settings.
- Set Wait with the − / + buttons (1 to 365) and pick Minutes, Hours, Days or Weeks.
- Or click a quick pick: 15 min, 1 hr, 1 day, 3 days or 1 wk.
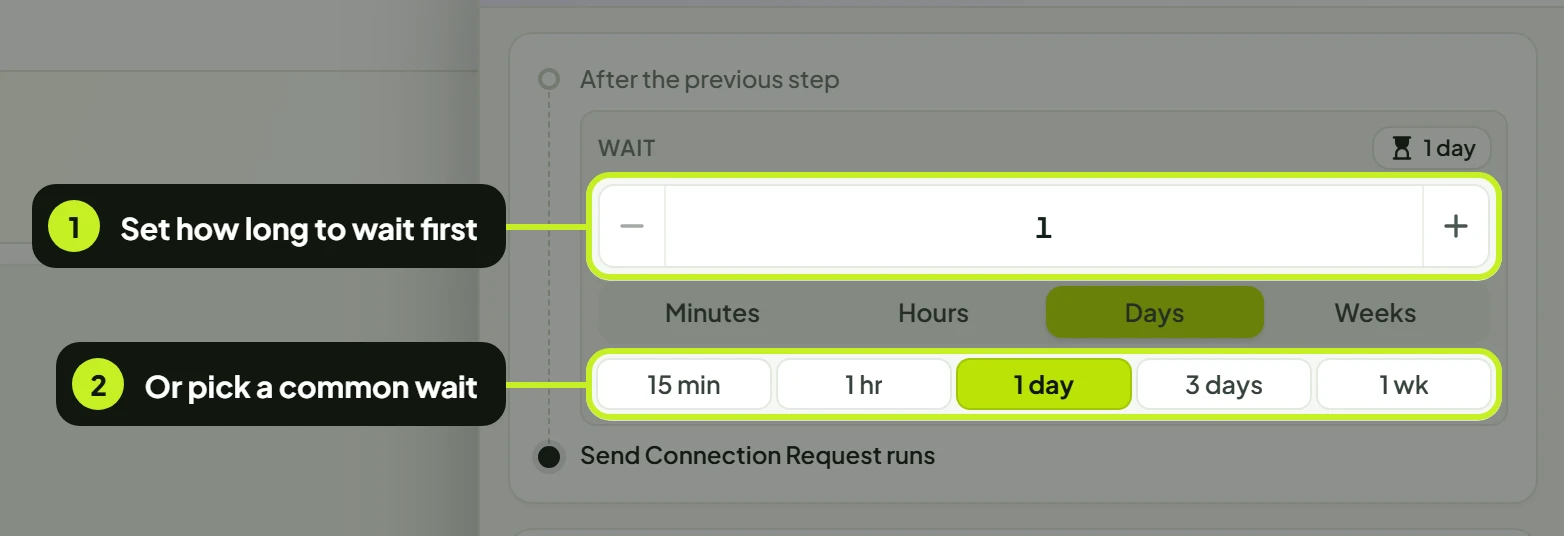
The line under the picker says when the step runs, for example Visit Profile will run after 15 minutes.
| Setting | What it does | Default | When to change |
|---|---|---|---|
| Wait | How long the step waits before running | 15 minutes on most steps; 7 days on Withdraw Request and on conditions; 5 minutes on Is a 1st degree linkedin connection? | Space out touches so they feel natural, for example a day between a visit and an invite |
| Counted from | When a lead enters the campaign (first step) or After the previous step | Set automatically | — |
| Run immediately | Skips the wait. Offered on Notify Webhook | Off | When the next system should hear about the lead straight away |
| Immediate / Delayed | The same choice on Send Email | Delayed | Immediate when the email should go out as soon as the lead gets there |
Outreach runs inside your sending schedule. Actions run on your Active Sending Days, between Window Start Time and Window End Time. See Launch settings and daily limits.
Engagement actions
Light-touch steps that make your name familiar before you ask for anything. None of them send a message.
Visit Profile
What it does: views the lead's LinkedIn profile from your seat.
Why use it: the lead sees that you looked at their profile, so your name is familiar when your invite arrives. It's the usual first step.
| Setting | What it does | Default | When to change |
|---|---|---|---|
| Wait | Time before the visit | 15 minutes | Rarely. As a first step it runs soon after the lead enters |
Like Recent Post
What it does: likes the lead's recent LinkedIn posts.
Why use it: a like is a friendly signal that costs the lead nothing, which warms them up before an invite or message.
- Under Configuration, set Post Count and Recent Posts Within (Days).
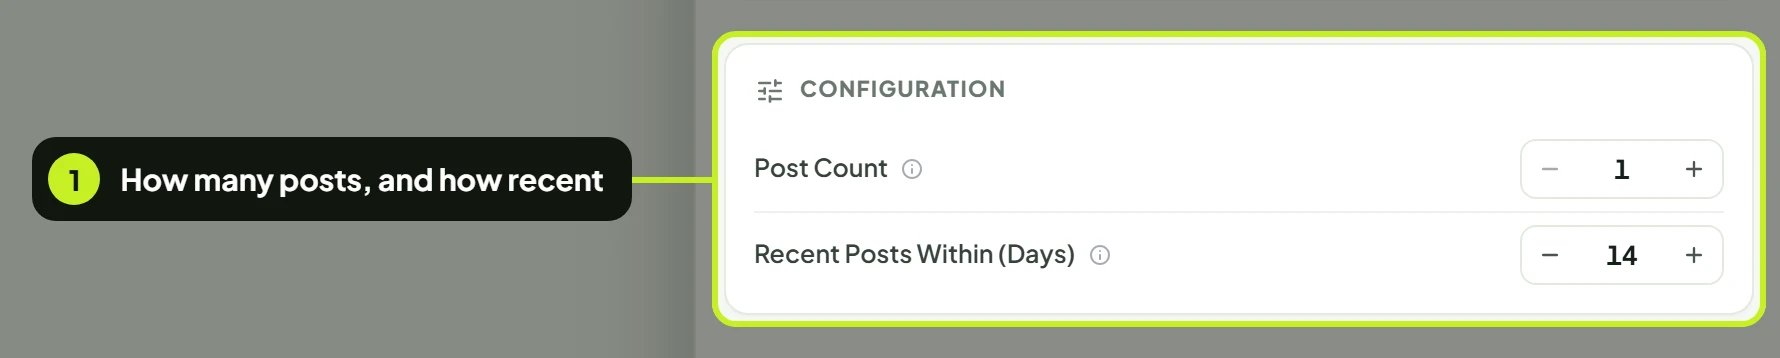
| Setting | What it does | Default | When to change |
|---|---|---|---|
| Post Count | How many recent posts to like (1 to 5) | 1 | Keep it at 1 or 2 so it doesn't look automated |
| Recent Posts Within (Days) | Only likes posts published in this many days (1 to 365) | 7 | Raise it for people who post rarely |
Comment on Post
What it does: leaves a comment on one of the lead's recent posts. The AI can write it, or you write your own.
Why use it: a thoughtful comment starts a public conversation and gets you noticed by the lead and their network.
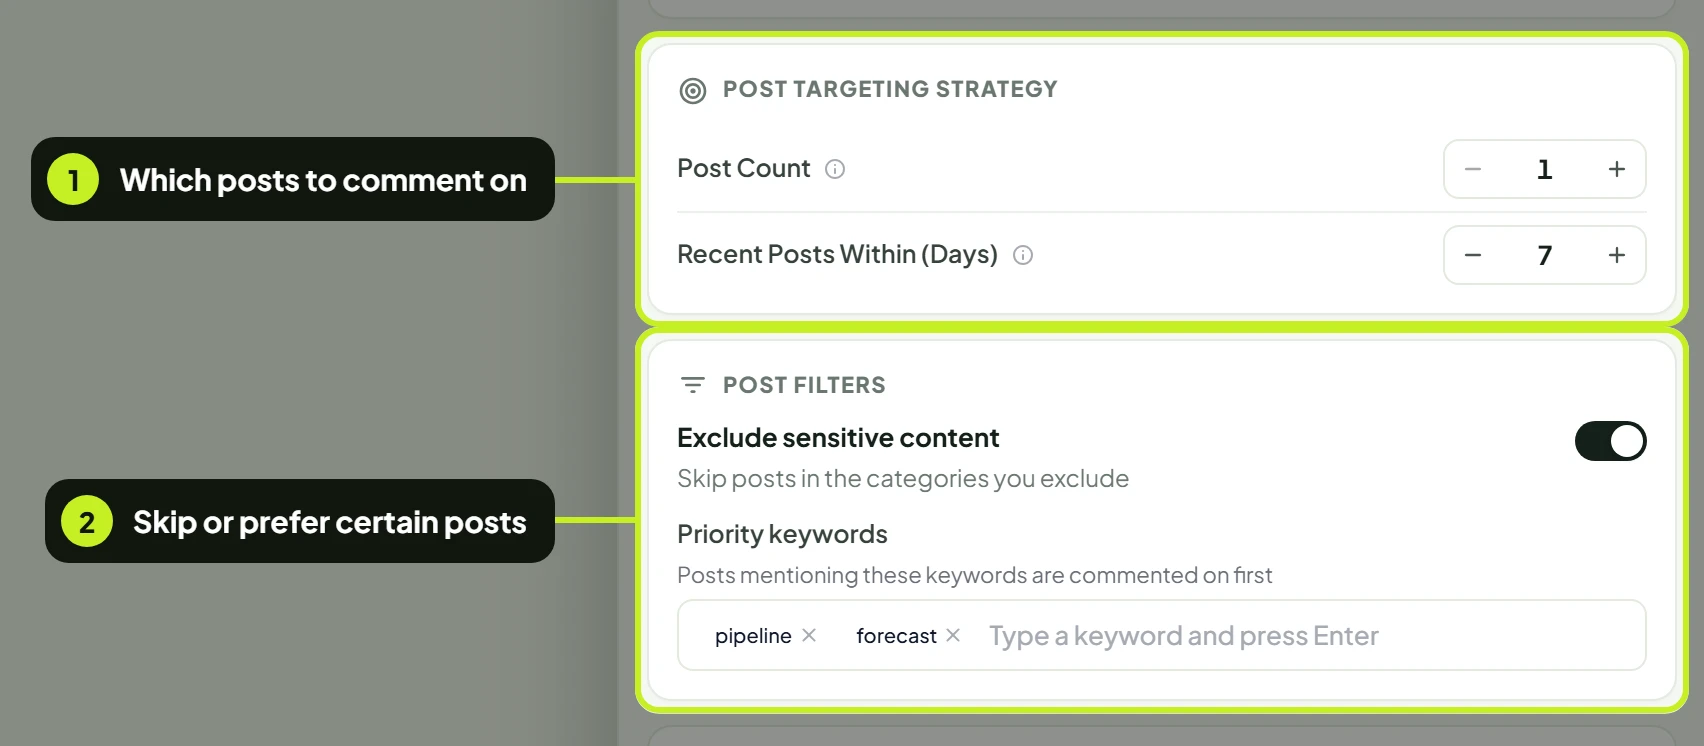
- Under Post Targeting Strategy, set Post Count and Recent Posts Within (Days).
- Under Post Filters, turn on Exclude sensitive content to skip posts in the categories you exclude, and add Priority keywords — posts mentioning them are commented on first.
| Setting | What it does | Default | When to change |
|---|---|---|---|
| Post Count / Recent Posts Within (Days) | Which recent posts qualify | 1 post, within 7 days | Widen the window for quiet posters |
| Exclude sensitive content | Skips posts in the categories you exclude | Off | Turn on to stay away from personal or sensitive topics |
| Priority keywords | Posts mentioning these words are commented on first. Type a keyword and press Enter | None | Add your product area or topics you can speak to |
| Configure With AI | The AI writes each comment. Set Comment Length (Short(1 sentence), Medium(2-3 sentences), Long(4+ sentences)), Comment Tone (Agreeable, Neutral, Constructive), Language and Additional Custom Guidelines | On, Medium, Agreeable, English | Turn off to write one comment yourself in Write a custom comment or an AI prompt… (300 characters, with First Name, Full Name, Company Name and Job Title tags) |
Click Generate Example to see a sample comment on a sample post.
Follow Profile
What it does: follows the lead on LinkedIn.
Why use it: the lead gets a notification that you followed them — a low-pressure touch that doesn't need them to accept anything.
| Setting | What it does | Default | When to change |
|---|---|---|---|
| Wait | Time before following | 15 minutes | — |
Follow Company
What it does: follows the lead's company page.
Why use it: you see the company's updates, which gives you something relevant to mention later, and it shows interest in their business.
| Setting | What it does | Default | When to change |
|---|---|---|---|
| Wait | Time before following | 15 minutes | — |
Outreach actions
The steps that actually reach the lead with a message.
Send Connection Request
What it does: sends a LinkedIn invitation, with or without a note.
Why use it: you can only send LinkedIn messages to 1st-degree connections, so the invite is the door to everything after it.
| Setting | What it does | Default | When to change |
|---|---|---|---|
| Wait | Time before the invite | 15 minutes | Put a day between a profile visit and the invite |
| Configure With AI | The AI writes a personal note for each lead from their profile | On | Turn off to write one note yourself in Invite message (up to 300 characters) |
| AI style | Tone, Formality, Approach, Focus, Intention, Call to Action, Personalization, Language | Moderate, Casual, Direct, Personal, Networking, Subtle, Specific, English | See AI writing settings |
| Engage with Recent Activity | Mentions the lead's recent LinkedIn activity in the note | Off | Turn on for leads who post often |
Send Message
What it does: sends a LinkedIn message to a lead you're connected with.
Why use it: it's your follow-up after an invite is accepted, and it reaches the lead's LinkedIn inbox directly.
Put it after a Yes. Messages only reach 1st-degree connections, so place this step on the Yes branch of Connection Request Accepted? or Is a 1st degree linkedin connection?.
| Setting | What it does | Default | When to change |
|---|---|---|---|
| Wait | Time before the message | 15 minutes | A day after acceptance feels natural |
| Configure With AI | The AI writes each follow-up | On | Turn off to write it yourself in Message |
| Smart Follow-up | Will only send if they haven't replied to you yet | On | Leave on, so nobody gets a follow-up after replying |
| AI style | Message Length, Tone, Language, Engage with Recent Activity, Additional Custom Guidelines | Medium (3-4 sentences), Casual, English | See AI writing settings |
| Attachment | One file, up to 10 MB, sent with the message | None | A one-pager or case study |
Send Inmail
What it does: sends a LinkedIn InMail, with a subject line.
Why use it: InMail reaches people you aren't connected with, without waiting for an invite to be accepted. InMail is a LinkedIn feature, so the sending seat needs InMail credits on its LinkedIn account.
| Setting | What it does | Default | When to change |
|---|---|---|---|
| Wait | Time before the InMail | 15 minutes | — |
| AI Writing Assistant | The AI writes each InMail | On | Turn off to write InMail Subject (200 characters) and InMail Message (2,000 characters) yourself |
| AI Generated Subject | The AI writes the subject too | On | Turn off to write one subject for everyone |
| AI style | Length, Tone, Language, Custom Guidelines | Medium (100-200 words), Casual, English | See AI writing settings |
| Attachment | One file, up to 10 MB | None | — |
Send Email
What it does: sends an email from a connected inbox.
Why use it: email reaches people who don't accept your invite or aren't active on LinkedIn, and it's the only action in an email campaign.
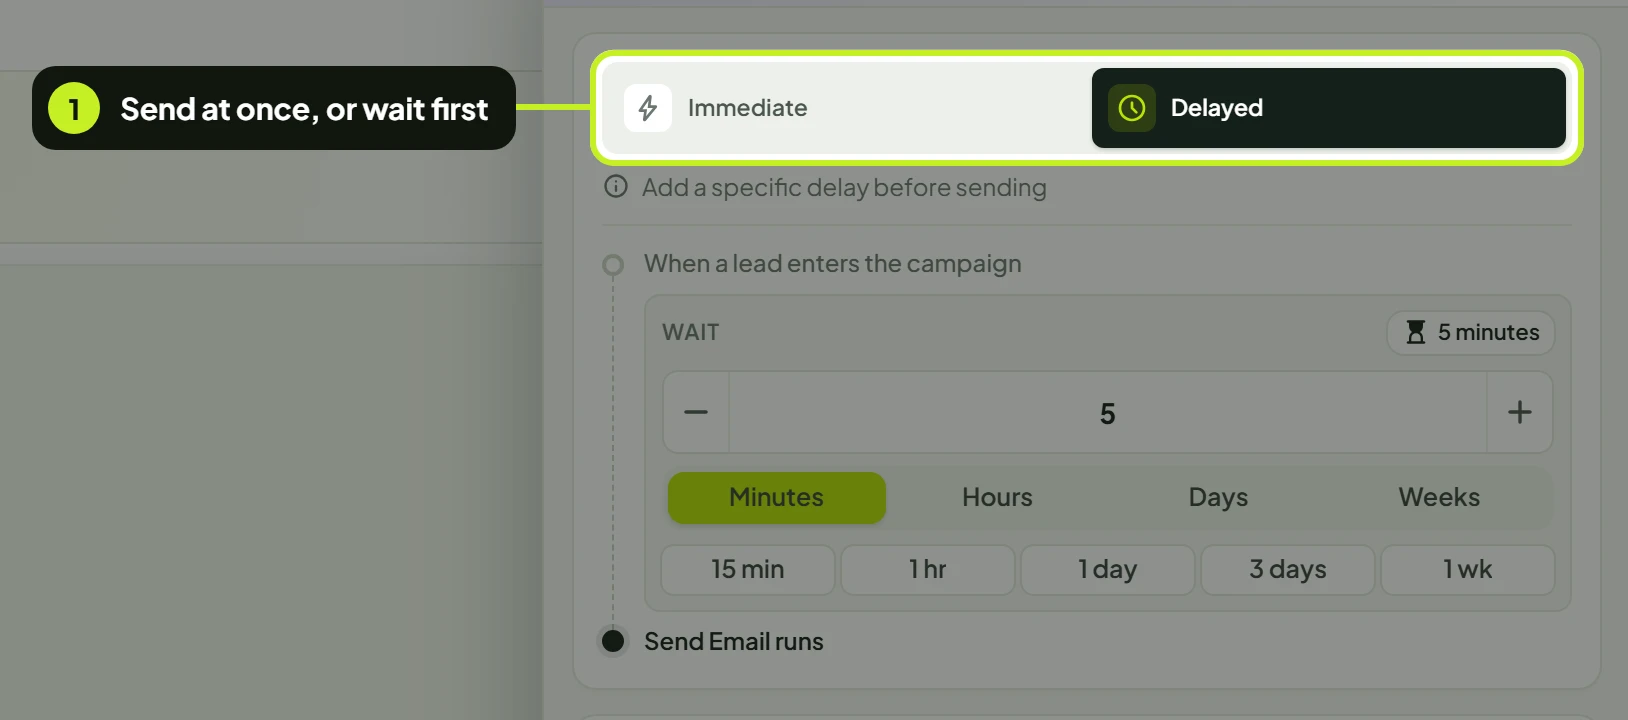
- Under How it runs, choose Immediate (send as soon as the lead gets here) or Delayed (wait first).
| Setting | What it does | Default | When to change |
|---|---|---|---|
| Immediate / Delayed | Send at once, or after the wait | Delayed, 15 minutes | — |
| Sending Email Account | The inbox the email comes from. Add Email Account opens the Accounts page | None | Required |
| Sender Display Name | The name shown as the sender (up to 45 characters) | Empty | Use a real person's name |
| AI Writing Assistant | The AI writes the subject and body | On | Turn off to write Subject and Email Content yourself, with First Name, Full Name, Company Name, Role and Industry tags |
| AI settings | Email Reach, Length, Tone, Language, personalisation, call to action, signature | Cold Outreach, Medium (5-8 sentences), Professional, English | See AI writing settings |
| Attachment | One file, up to 10 MB | None | — |
Housekeeping actions
Steps that tidy up after the outreach.
Withdraw Request
What it does: withdraws your connection request if it's still pending.
Why use it: invitations that nobody answers pile up on your seat. Withdrawing them keeps your pending invitations short and tidy. Put it on the No branch of Connection Request Accepted?.
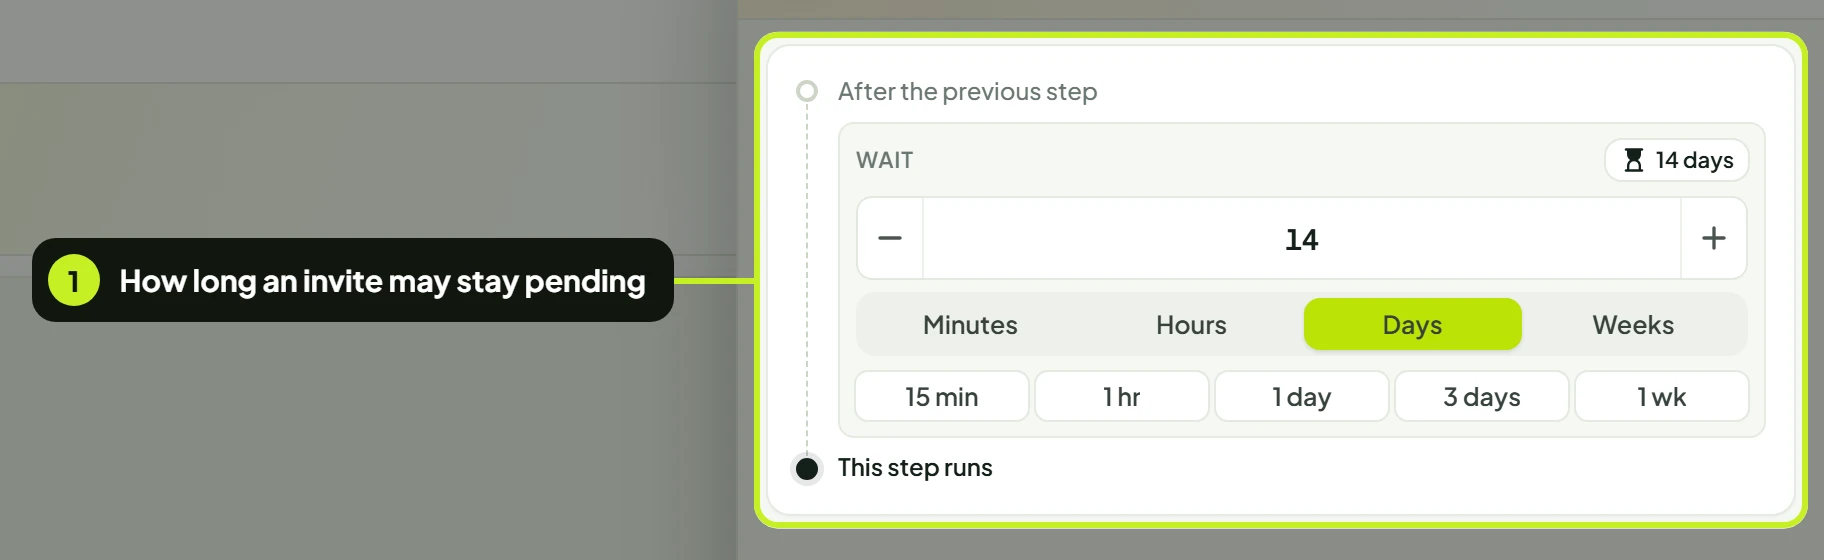
- Set how long to wait before withdrawing. The default is 7 days.
| Setting | What it does | Default | When to change |
|---|---|---|---|
| Wait | How long the invite may stay pending | 7 days | The Connect and follow up template uses 11 days |
Add/Update Tag
What it does: replaces the lead's tag with the tag you pick.
Why use it: tags let you filter leads by where they ended up, for example Accepted on one branch and No response on another.
- Under Tag, click Select a tag and pick one. You can search, create, rename or delete tags right in the picker.

A lead has one tag at a time. This step replaces whatever tag the lead had.
| Setting | What it does | Default | When to change |
|---|---|---|---|
| Tag | The tag the lead gets | None | Required |
| Wait | Time before tagging | 15 minutes | — |
Integrations
Notify Webhook
What it does: sends the lead's data to a webhook you've set up.
Why use it: it tells another tool — your CRM, Slack, or an automation — that a lead reached this point, without exporting anything by hand.
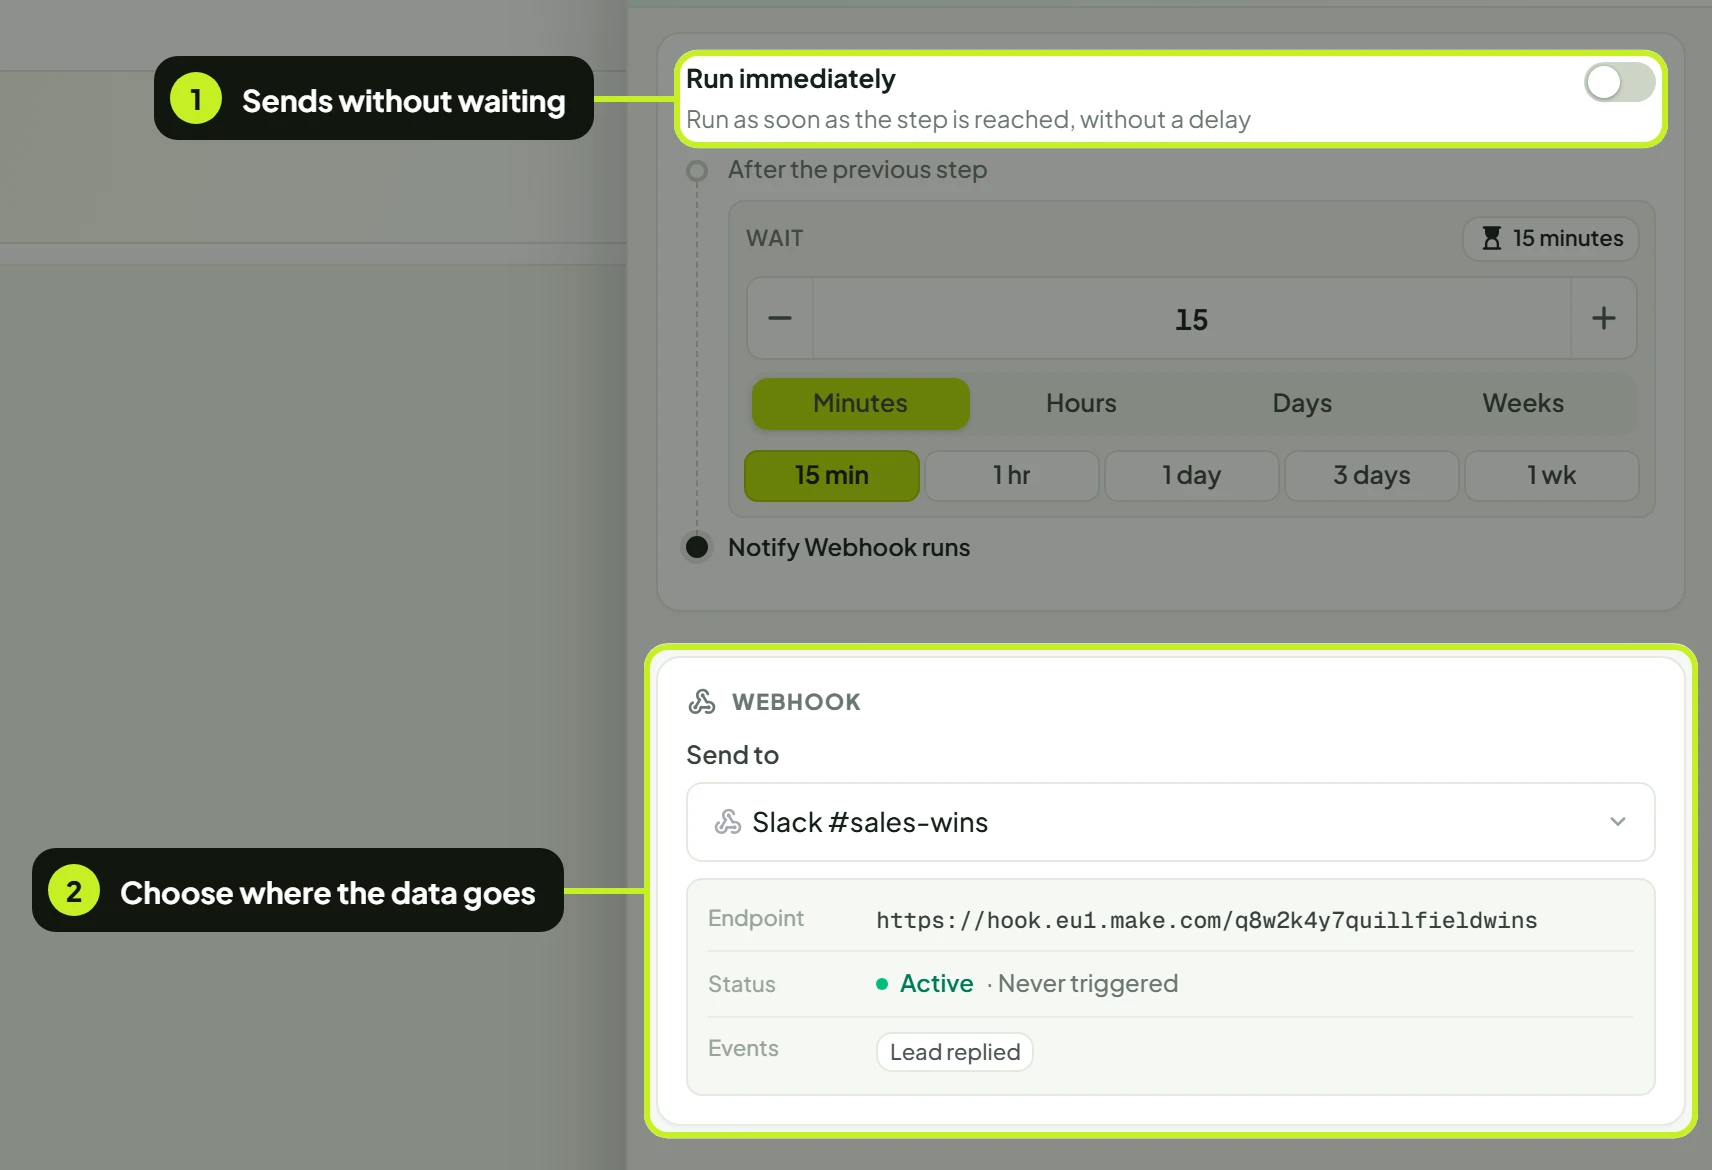
- Turn on Run immediately to skip the wait.
- Under Webhook, pick the webhook to Send to. No webhooks yet? Click Add Webhook.
| Setting | What it does | Default | When to change |
|---|---|---|---|
| Run immediately | Skips the wait | Off | When the other tool should hear right away |
| Send to | The webhook that receives the lead | None | Required |
A paused webhook receives nothing. The step shows This webhook is paused, so nothing is delivered until it is resumed in Settings. See Webhooks.
Conditions
A condition checks one thing about the lead and sends them down Yes or No.
| Condition | Yes means | Use it to |
|---|---|---|
| Connection Request Accepted? | The lead accepted your invite | Message people who accepted; withdraw from people who didn't |
| Replied on LinkedIn? | The lead replied on LinkedIn | Stop following up once someone answers |
| Replied via Email? | The lead replied to your email | Stop your email follow-ups after a reply |
| Email Opened? | The lead opened your email | Send a different follow-up to people who read it |
| Link Clicked in Email? | The lead clicked a link in your email | Follow up quickly with people who showed interest |
| Is a 1st degree linkedin connection? | You're already connected | Message existing connections and invite everyone else |
How a condition checks
Every condition has two ways to run, under How it runs:
- Wait a specific amount of time — the condition waits for the Condition Evaluation Window, checks once, then sends the lead down Yes or No. The canvas shows Check after 7 days, for example.
- Set the window under Condition Evaluation Window. The default is 7 days (5 minutes for Is a 1st degree linkedin connection?).
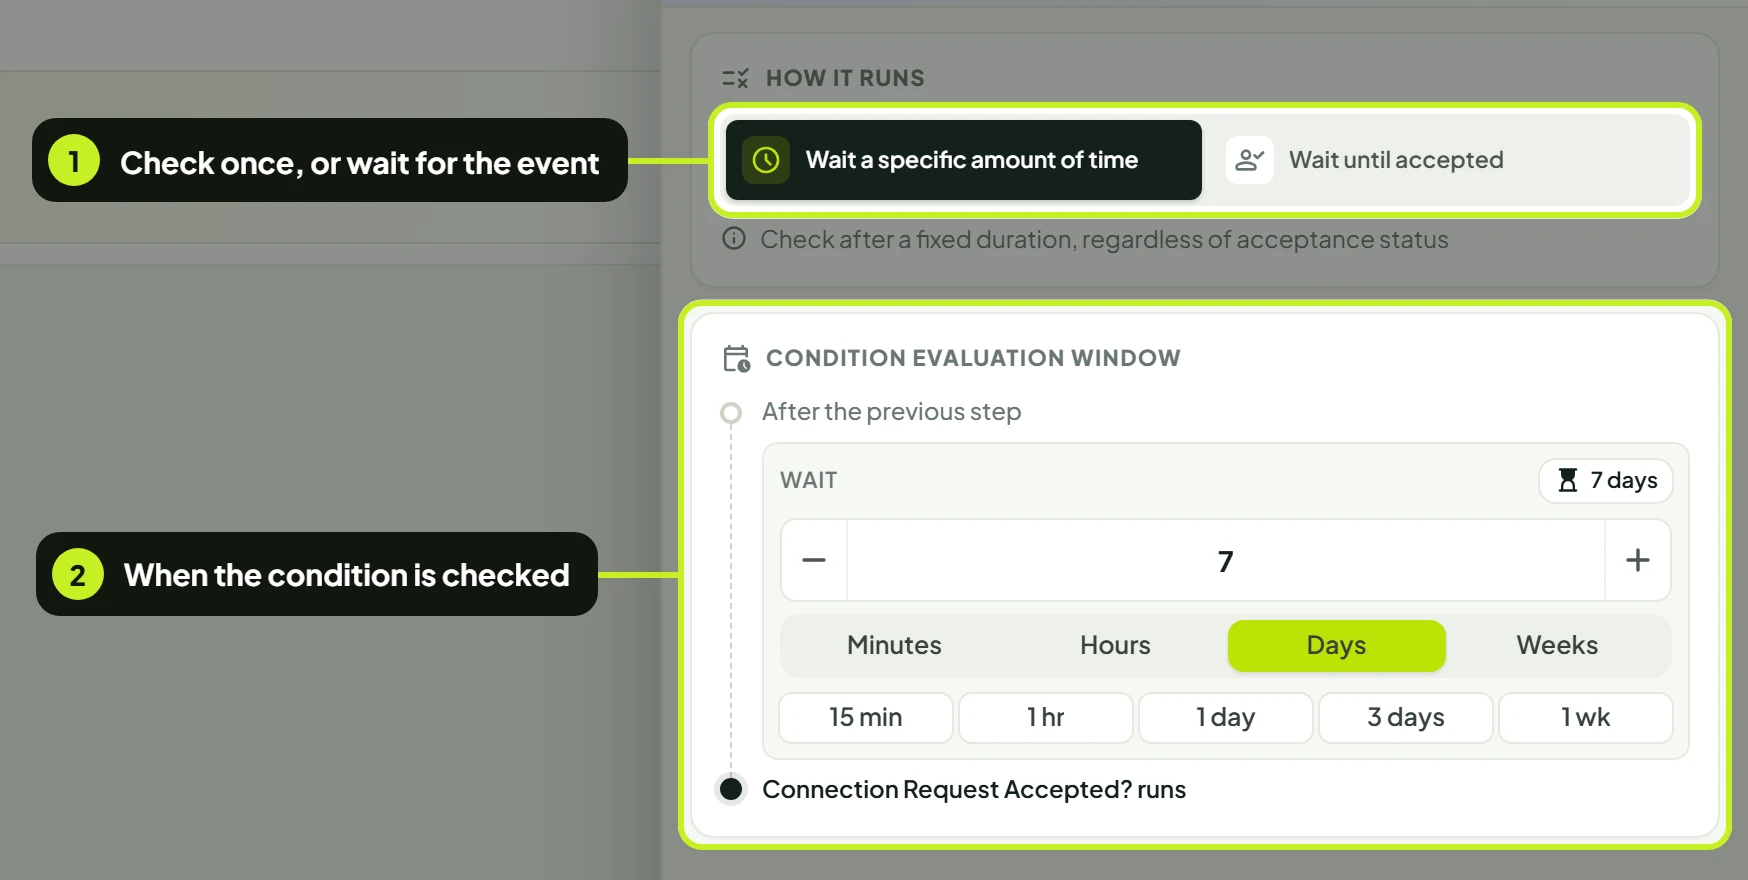
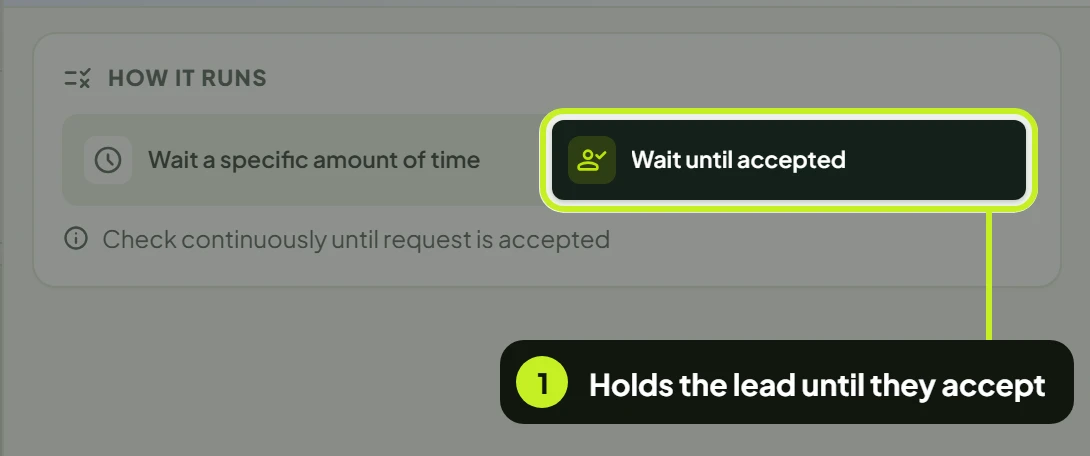
The second way is a wait until mode, named for what it waits for: Wait until accepted, Wait until replied, Wait until opened or Wait until clicked.
- Click the wait-until option. The lead stays at this condition and moves on only when it happens. There's no window to set.
| Mode | What happens | Canvas | Use it when |
|---|---|---|---|
| Wait a specific amount of time | Checks once after the window, then Yes or No | Check after … with a Yes / No split | You want to do something different for people who didn't respond |
| Wait until … | Holds the lead until the event happens or the maximum timeout expires | One line, no Yes / No split | You only want to continue with people who respond |
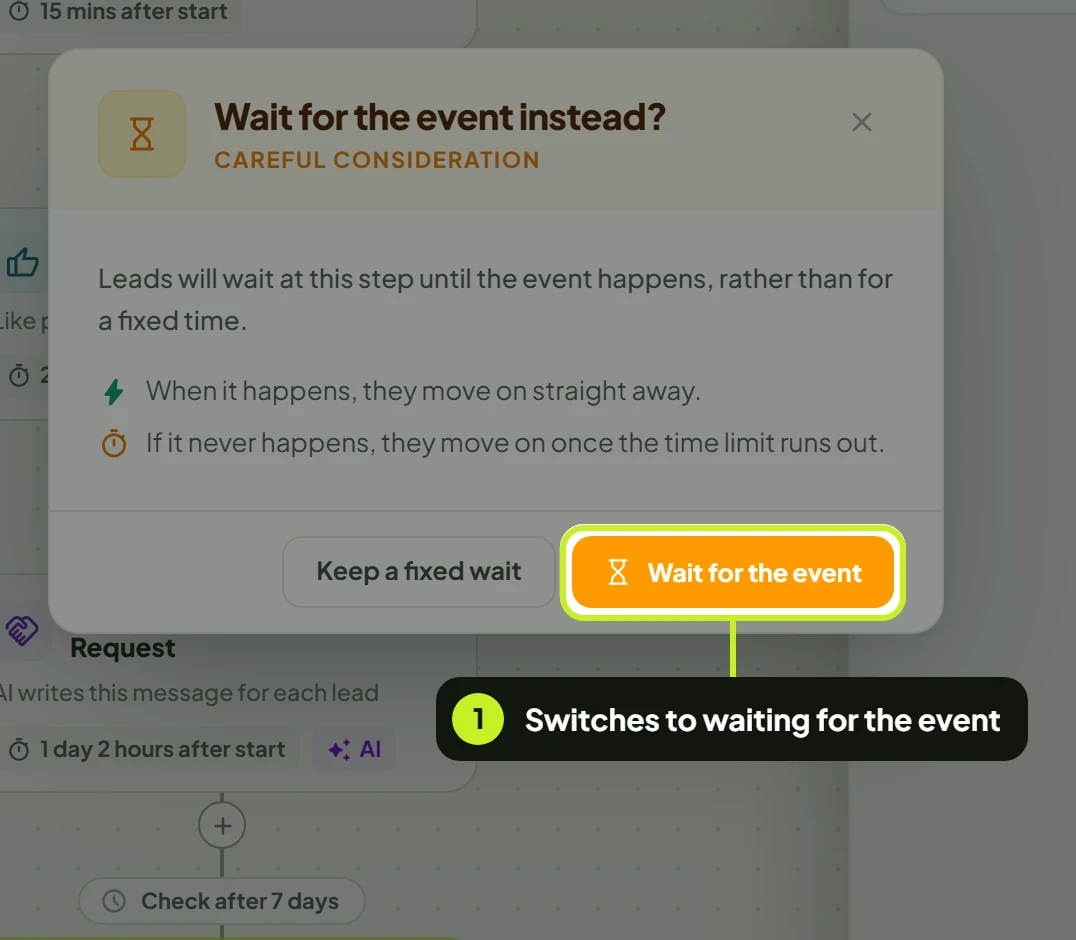
Switching an existing condition to wait until removes the steps below it. If the condition already has steps on its branches or after it, you'll see Wait for the event instead?. Clicking Wait for the event removes its Yes / No branches and every step after it. Click Keep a fixed wait to keep them.
Remove a step
Click the bin icon on a card. In Remove this step?, click Remove step. Removing a condition also removes the steps in its branches, and the dialog says how many.
You can't go below two steps. You'll see Your flow must keep at least 2 steps.
Example sequences
These are the templates offered under Start from a template on an empty canvas.
| Template | Steps |
|---|---|
| Connect and follow up | Visit Profile → Send Connection Request → Connection Request Accepted? — Yes: Send Message → Replied on LinkedIn? (No: Send Message). No: Withdraw Request after 11 days |
| Warm up, then reach out | Visit Profile → Like Recent Post → Send Connection Request → Connection Request Accepted? — Yes: Send Message. No: Send Email |
| Connections first | Is a 1st degree linkedin connection? — Yes: Send Message → Replied on LinkedIn?. No: Visit Profile → Send Connection Request → Connection Request Accepted? |
| InMail first | Visit Profile → Send Inmail → Replied on LinkedIn? — No: Send Connection Request |
| Email with smart follow-ups (email) | Send Email → Replied via Email? — No: two more emails, each stopping on a reply |
| Branch on opens (email) | Send Email → Email Opened? — Yes: follow-up until they reply. No: resend after a day |
| Follow up on clicks (email) | Send Email → Link Clicked in Email? — Yes: follow-up. No: a gentle bump |
| Nurture, then ask (email) | Two value emails, a clear ask, and a polite close-the-loop |
Common problems
| What you see | What it means | What to do |
|---|---|---|
| Campaign flow requires at least 2 sequence steps. | The sequence is too short to save or launch | Add another step |
| Your flow must keep at least 2 steps. | Removing this step would leave fewer than two | Add a step first, then remove this one |
| Unsaved changes in the toolbar | You changed steps but haven't saved | Click Save draft or Save changes |
| Unsaved Flow Changes when leaving | You're leaving with edits not saved | Click Save & Continue, or Keep editing |
| A condition shows one line instead of Yes / No | It's set to a wait-until mode | Switch it back to Wait a specific amount of time if you need a No branch |
| A message step never sends to some leads | Smart Follow-up is on and they've already replied, or they aren't a 1st-degree connection | That's expected. Put Send Message after a Yes |
| No webhooks yet on Notify Webhook | There's no webhook to send to | Click Add Webhook. See Webhooks |
| Some step types aren't available after Import Flow | The file has steps this campaign's channel can't use | Remove or replace those steps |
Next: Tune what the AI writes in AI writing settings.